Overview
In many co-curricular activities (CCAs), interviews are usually conducted to recruit new members during the beginning of the semester. However, the scheduling of interviews can be a very tedious process, especially when there are a lot of applicants. In light of this, we created Scheduler, a desktop application which aims to automate and streamline the process of scheduling interviews to reduce the workload of the administrators.
The main feature of Scheduler is to match interviewees with available interview time slots to generate an optimal interview schedule. Other features introduced to streamline the process of scheduling interviews include emailing the allocated slot to the respective interviewee. The user interacts with it using a CLI, and it has a GUI created with JavaFX. It is written in Java, and has around 20 kLoC.
Summary of contributions
-
Major enhancement: added the ability to schedule interviews automatically using a graph algorithm
-
What it does: allows the user to schedule interviews automatically for the interviewees using the imported interviewers availability and interviewees details.
-
Justification: This feature is the central feature behind the idea of the entire Scheduler application which is to schedule interviews automatically so that the user does not have to manually schedule interviews and thus reduce their workload significantly.
-
Highlights: The scheduling feature uses an algorithm known as Hopcroft Karp algorithm which tries to maximise the number of interviewees who are allocated with an interview slot. Please refer to the developer guide for more information regarding the algorithm.
-
Credits:
-
John Hopcroft, Richard Karp, Alexander Karzanov, the creators of Hopcroft-Karp algorithm which enables our application to maximise the number of interviewees which are allocated an interview slot.
-
Authors of https://www-m9.ma.tum.de/graph-algorithms/matchings-hopcroft-karp/index_en.html, for the clear explanation of the logic behind Hopcroft Karp algorithm.
-
-
-
Minor enhancement: Updated the link in the help window.
-
Other contributions to features
-
Created a data structure
Schedulewhich models a schedule timetable as can be seen in the application. The data structure is used to link multiple features together, such as adding an interviewer and displaying it on the ui. -
Modified and implemented the logic which links the displayed schedules in the UI to the underlying
Scheduledata structures such that changes to the schedules data can be updated in the UI by using the Observer pattern. -
Created an
AppStatusclass using the Singleton design principle to help to manage the status of the application across different functionalities.
-
-
Code contributed: [Functional code] [Test code]
-
Other contributions:
-
Project management:
-
Managed releases v1.1-v1.4 on GitHub.
-
Managed milestones v1.0-v1.4 on Github.
-
Drafted project plan for the development of the application.
-
-
Documentation:
-
Community:
-
Tools:
-
Set up Coveralls and AppVeyor for the team repository (#1)
-
-
Contributions to the User Guide
Given below are sections I contributed to the User Guide. They showcase my ability to write documentation targeting end-users. |
Import your csv file into the application
To begin, let’s download sample interviewers availability and interviewees details in comma-separated value (.csv) format and import the data into Scheduler.
Sample/Template of Interviewer’s Availability and Interviewee Details
-
Interviewers' availability: http://bit.ly/interviewerTemplate
-
Interviewees' details: http://bit.ly/intervieweeDetails
Type import interviewer fp/FILE_PATH to import interviewers availability. To import interviewees details, type
import interviewee fp/FILE_PATH . FILE_PATH is the full/absolute file path to where the interviewers availability or
interviewees details .csv file is located.
When you have imported interviewers' availability, you will see that the interviewer’s availability are displayed as tables in the Schedules tab. In the tables, there will be cells with 1 and 0s. 1 means that the interviewer of that column is available for interview at that particular time slot (the time slot is at the leftmost column on the same row where the 1 is located), otherwise is 0. The imported interviewers details will also be displayed in the Interviewers tab.
Schedule interviews
Type schedule in the command line of the application. Scheduler will then schedule the interviews for you and the result
will be displayed in the Schedules tab! If an interviewee is allocated a time slot, the name of the interviewee will be displayed
in one of the tables in the Schedules tab depending on which slot is allocated to him/her.
At the cell which displays the interviewee’s name, the time slot allocated to it is on the leftmost column of the same row, and the interviewer that will be interviewing him/her is the name displayed beside the department in the first row of the same column.
Email Interviewee
Want to email the allocated time slot to an interviewee? Simply type email ct/timeslot n/INTERVIEWEE NAME, replacing
INTERVIEWEE NAME with the name of the interviewee.
Export Scheduled Result
Now let’s export the scheduled result to an external .csv file! Simply type export fp/FILE_PATH, replacing FILE_PATH with the full/absolute
path to your target destination of the .csv file. If the .csv file has not exist, Scheduler will create the exported result file
at the target destination you specify in FILE_PATH!
That’s all for the quick start, hope you enjoy using Scheduler!
Scheduling the interviews schedule
Schedule and allocate interviewees to the available interview slots based on the availability of interviewees and their choice of department. The scheduled result will then be displayed in the Schedules tab of the UI of Scheduler.
Format: schedule
To ensure that the displayed scheduling result is always updated with the latest database of interviewers and interviewees,
add/delete/edit of interviewee or interviewer will remove the scheduling result, hence you will need to type schedule again.
|
Contributions to the Developer Guide
Given below are sections I contributed to the Developer Guide. They showcase my ability to write technical documentation and the technical depth of my contributions to the project. |
Scheduling Feature
Algorithm
The scheduling of interviews is essentially a maximum bipartite matching problem. The scheduling feature is trying to find the maximum number of matching between available interview slots and interviewees.
In this application, the selected algorithm is Hopcroft-Kap algorithm. The complexity of the algorithm is o(√v x e), which is reasonably fast. The relevant details of the algorithm are as below:
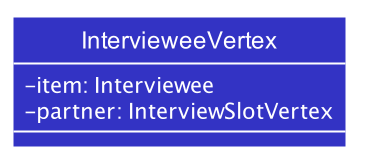
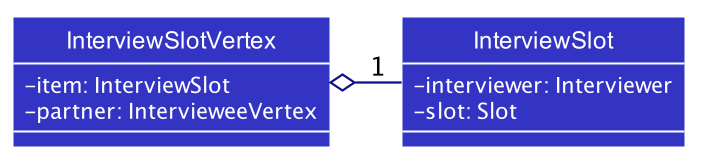
Vertex
Interviewee and interview slot.
Edge
An edge represents a possible matching relationship between interviewee and interview slot. An edge exists between interviewee and interview slot if and only if the interviewee can attend the slot.
Matching Criteria
An interviewee can match an interview slot (i.e. can attend it) if all the criteria below are fulfilled:
-
The timing of the slot matches one of the available timings of the interviewee.
-
The department of the interviewer at that interview slot matches the department of choice of the interviewee.
Explanation of the Algorithm
The activity diagram below summarises the key steps in the algorithm.
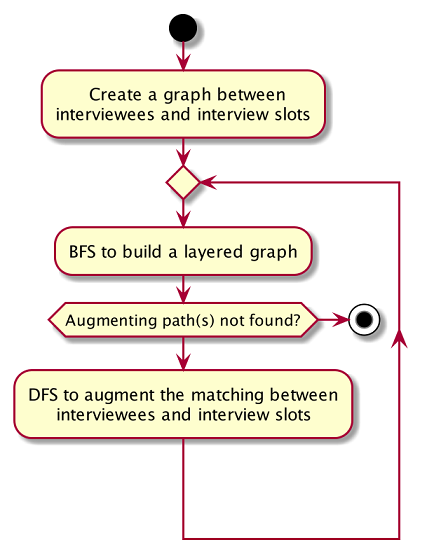
Referring to the diagram above, a graph between interviewees and interview slots will first be built. Specifically, the graph built is a bipartite graph where each interviewee is linked to the slot that it can match and vice versa, but interviewees are not linked with each other, same goes to interview slots. Thus, the 2 distinct groups of vertices in the graph are interviewee vertices and interview slot vertices. Before continuing, please read the below clarification about the terms unmatched and free.
| The term unmatched refers to a vertex that is not matched to its previous adjacent vertex by DFS. The term free refers to a vertex that is not matched to any other vertex yet by DFS. |
A breadth-first-search (BFS) is then conducted on all free vertices in the graph to search for augmenting paths which in the process will construct a layered graph. The BFS is slightly special as it will visit adjacent vertex in an alternating sequence of unmatched and matched edges.
The routine above is repeated until a layer of free vertices are found (i.e. augmenting path(s) is found) or the layered graph cannot be further extended (i.e. all augmenting path have been exhausted).
If augmenting path(s) exists, depth-first-search (DFS) will then be applied to every free vertex in the last layer of the layered graph to increase the number of matching between interviewee and interview slot. The DFS will start on one of the free vertices in the last layer and traverse through one of the augmenting path(s) which the free vertex lies in. When DFS hits the ends of an augmenting path, the unmatched and matched relationships between the vertices along the path will be flipped. Due to this alternating unmatched and matched relationship, the number of matching(a.k.a. cardinality) along the path will be increased by exactly 1 when the relationships along the path are flipped.
When the relationships are flipped, the vertices will be marked as used such that it cannot be used as one of the vertex along the other augmenting paths in the layered graph for the other iterations of DFS on the current layered graph.
The process of BFS followed by DFS will keep repeating until no more augmenting path(s) can be found in the bipartite graph of interviewee and interview slots, which marks the termination of the algorithm. At this point, the maximum number of matching have been found. This is based on a simple graph theory:
The number of matching in a graph is maximal if and only if no more augmenting path exist.
The theory above is so because if an augmenting path exists, it means that the number of matching along that path can be increased by 1, which in turn increases the number of matching in the graph.
Notes
-
Augmenting path: A simple path alternating between unmatched edges and matched edges. An augmenting path must start with a free vertex and ends with a free vertex. Thus, the patten of the alternating edges will always be unmatched, matched, unmatched …., matched, unmatched.
-
Matched edge: An edge is matched if the two vertices connected by it are matched to each other in previous iterations of the DFS. In the case of the application, one of the two vertices will be an interviewee and the other will be an interview slot.
-
Unmatched edge: An edge is unmatched if the two vertices connected by it are not matched to each other in previous iterations of DFS.
-
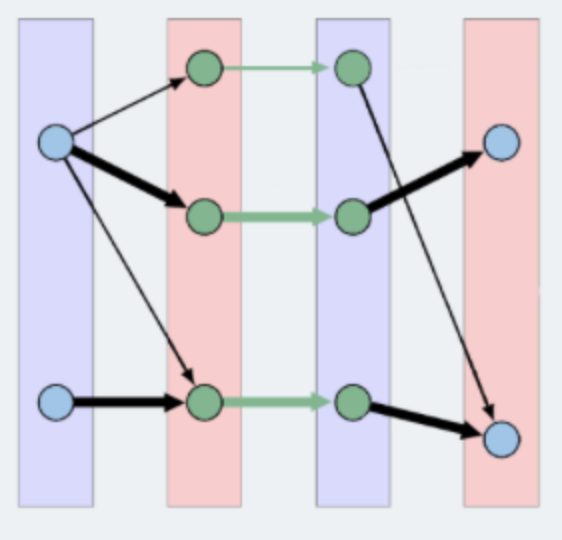
Layered graph: A layered graph is a graph formed by multiple layers of vertices. In this case, the layers are alternating between unmatched and matched vertices, except that the first layer of the graph are always a layer of free vertices. The last layer of the of the graph can either be a layer of matched vertices or free vertices (if augmenting path(s) exists). Below is an example of a layered graph:
Implementation
The implementation of the algorithm is encapsulated in the the graph subpackage in the logic package. Below is a
class diagram describing the essential components of the graph package.
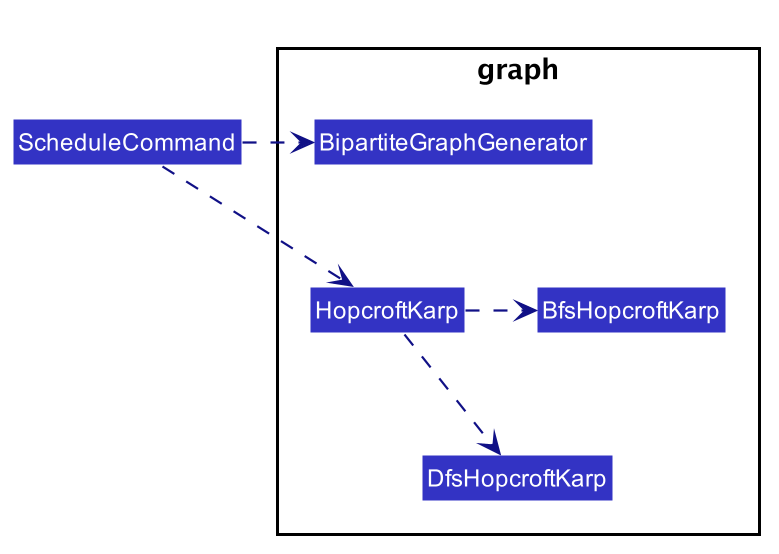
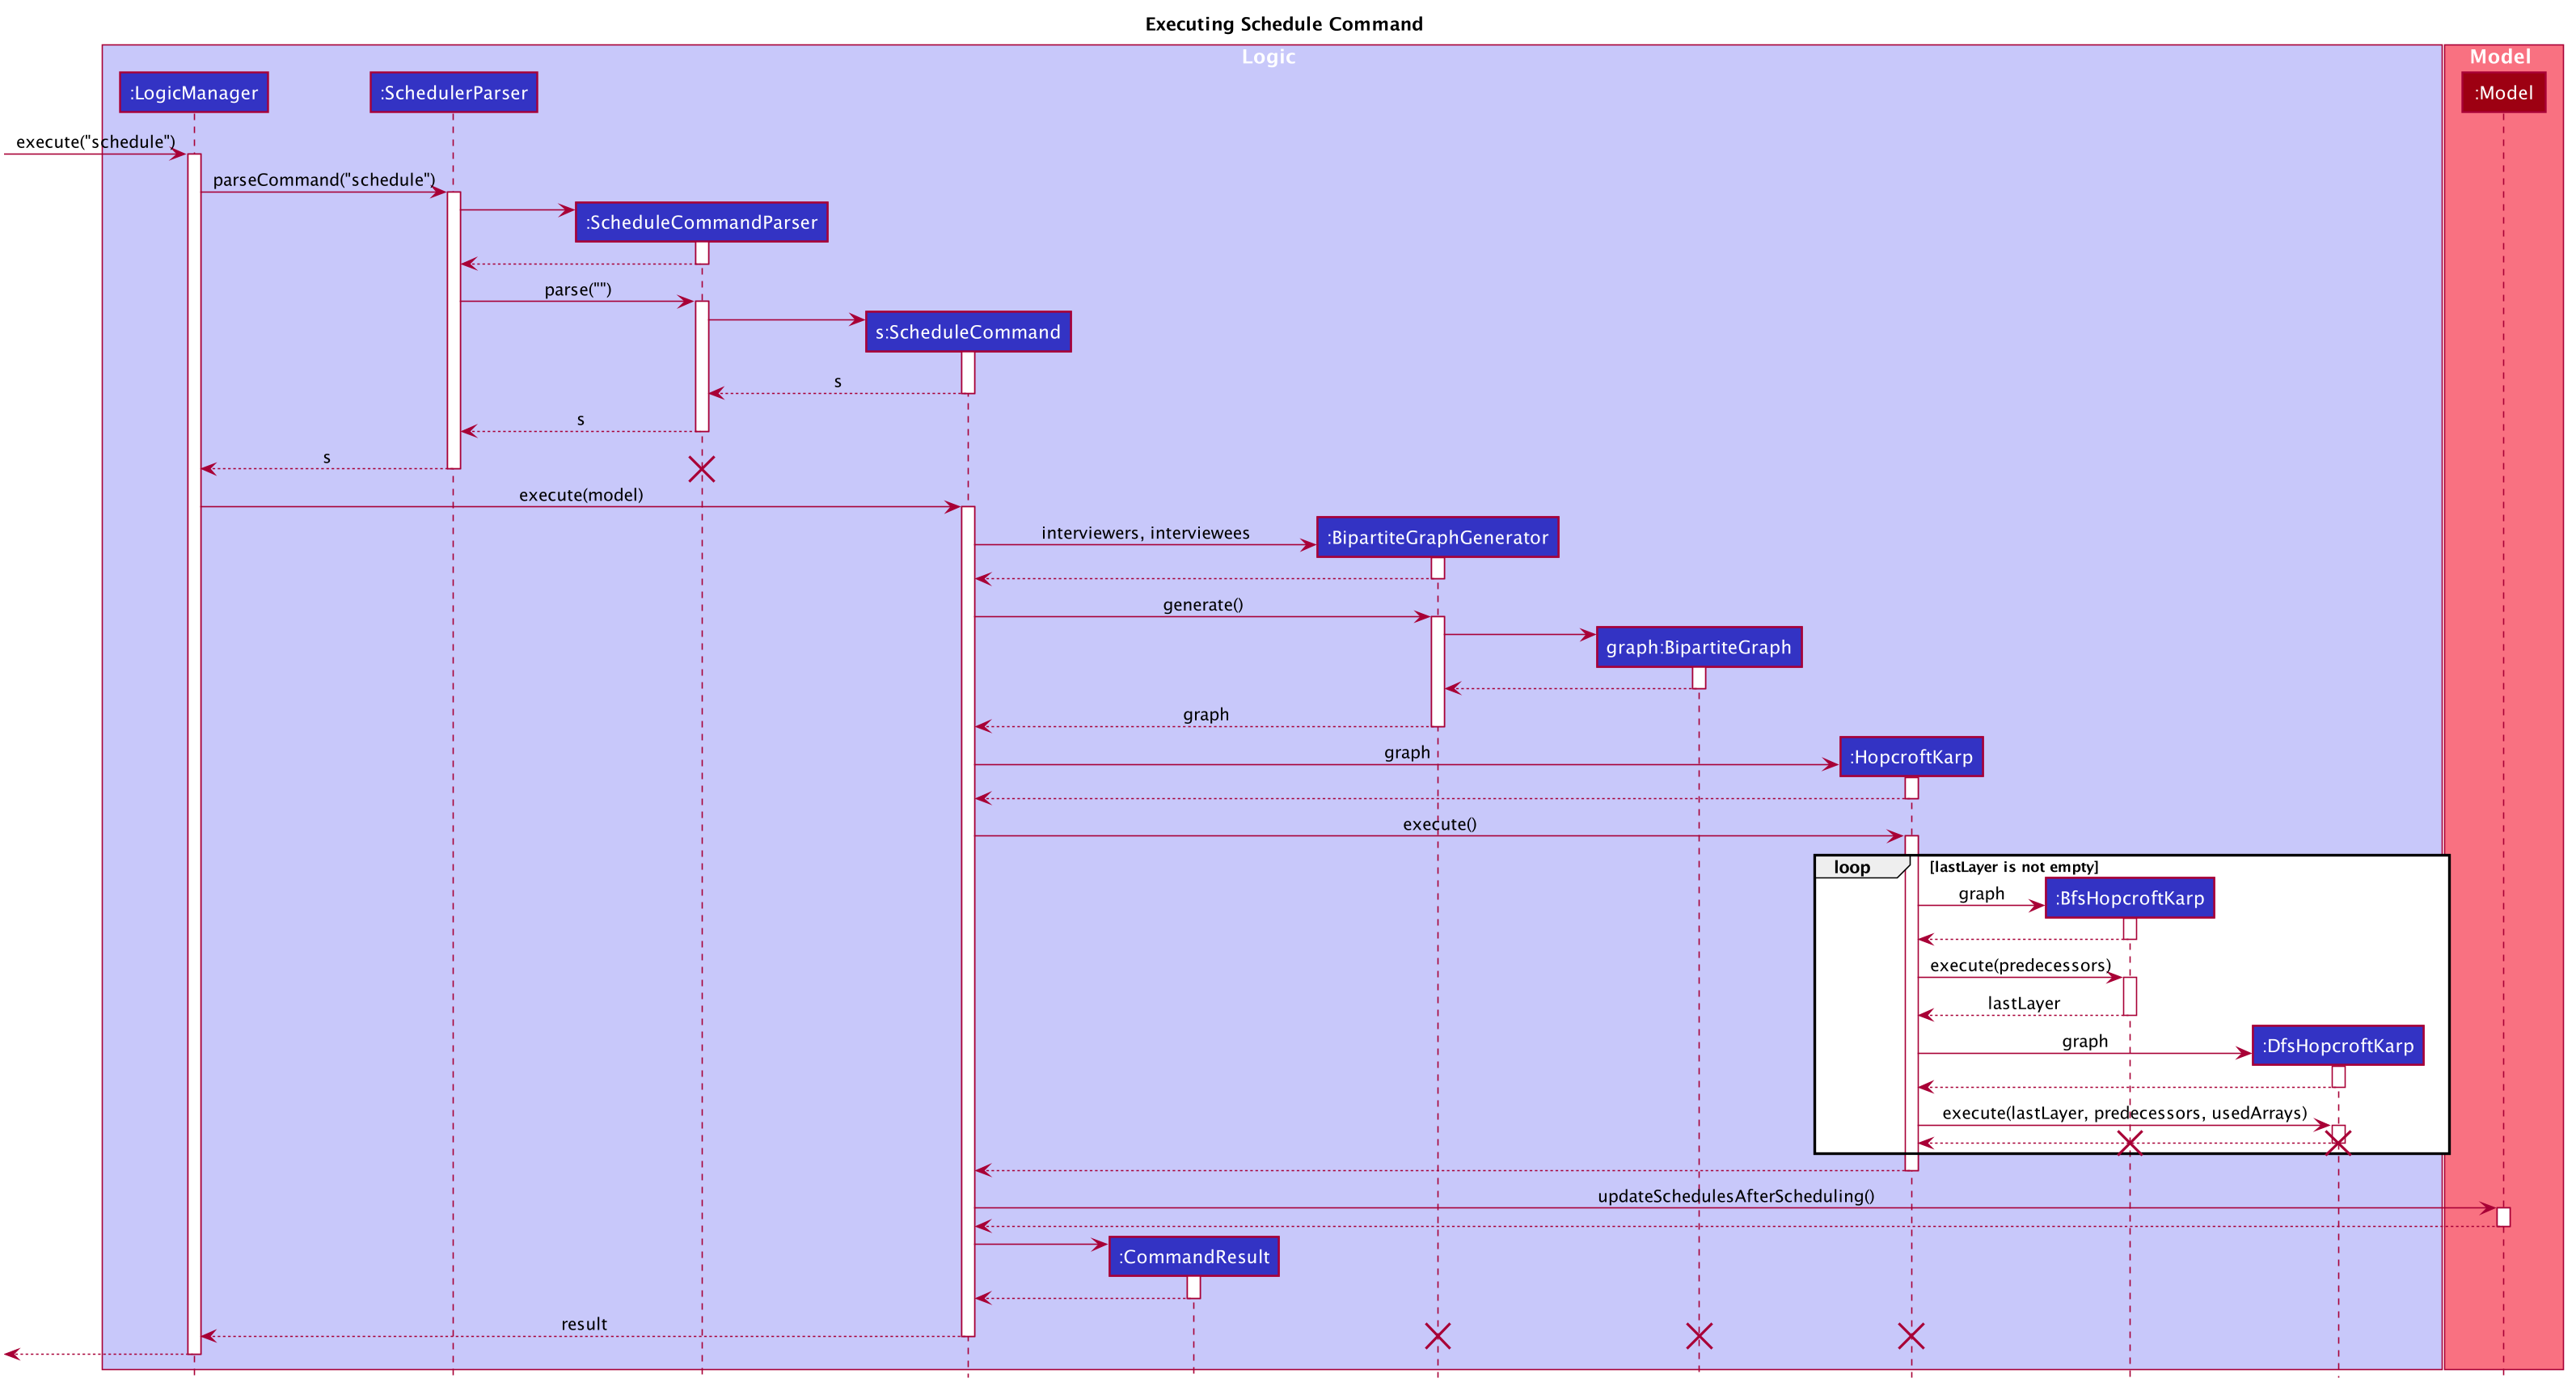
A Command object called ScheduleCommand makes use of the graph package to schedule the interviews for the interviewee.
It first uses BipartiteGraphGenerator to generates a BipartiteGraph which models the graph of interviewee and
interview slots. The BipartiteGraph object is then passed to a HopcrofKarp object which implements the logic of
HopcroftKarp algorithm, where the BFS and DFS logic is split into BfsHopcroftKarp and DfsHopcroftKarp object to better
manage the implementation of the algorithm.
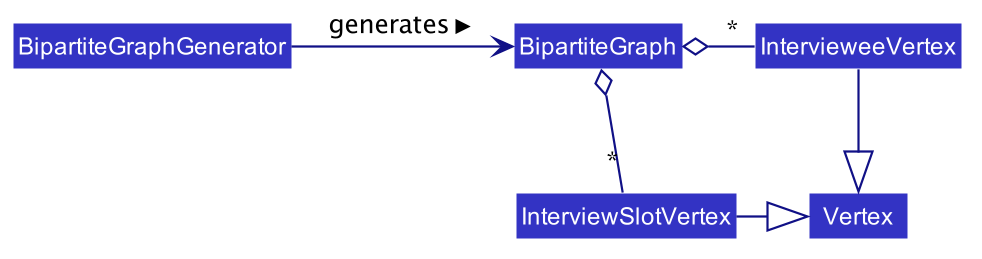
HopcroftKarp will then be executed which will run the algorithm and schedule interviews for the interviewees. To record
the result of scheduling, it will modify the matching status between IntervieweeVertex and InterviewSlotVertex in the
BipartiteGraph object passed to it.
After the HopcroftKarp algorithm has finished executing, ScheduleCommand will then use the BipartiteGraph object
to update the allocated slot to an Interviewee. It will also update the allocated slots to the Interviewer which will be
interviewing the Interviewee. Finally, the ScheduleCommand will interact with Model to reflect the scheduling result in
the Ui.
Below are some class diagrams and a sequence diagram to aid the above explanation.
Scheduling Interviews
-
Import .csv files of interviewers' availability and interviewees' details using the
importcommand.-
Please refer to the QuickStart section in the user guide to download the templates of the interviewers' availability and interviewees details.
-
-
Type
schedulein the text console of the app and press enter. -
Expected: Schedules in the
Schedulestab reflects the scheduled result accordingly, i.e. the name of the interviewee shows up in the interview schedule if its availability and department matches one of the available interview slots (originally marked as 1 in the schedules when the interviewer’s availability is imported). The text console will also shows relevant message about the interview result, e.g. "All interviewees are allocated with a slot!", "Interviewees that are not allocated a slot" followed by the number and name of the interviewees that are not allocated a slot, or "No matching is found :(". -
You can use the sample test data below to test if the scheduling feature is working properly.
-
All interviewees are allocated a slot (Interviewees data).
-
Some interviewees are allocated a slot (Interviewees data).
-
All interviewees are not allocated a slot (Interviewees data).
-
You can also design your own test data to check if the scheduling feature is working properly by adding some available interview slots in the interviewer’s availability template. Then, add interviewees which have availabilities and department that match the available interview slots. Import the data and check if the interviewees name show up in the schedules.
-
Note that some interviewees may not be allocated a slot because of unavoidable collisions between interviewees which have the same availability and department.
-
You can also test the opposite way, i.e. design test data which contains interviewees that cannot be allocated a slot and check if the name of the interviewee does not exist in the schedule.
-