By: Team SE-EDU Since: Jun 2016 Licence: MIT
- 1. Setting up
- 2. Design
- 3. Implementation
- 4. Documentation
- 5. Testing
- 6. Dev Ops
- Appendix A: Product Scope
- Appendix B: User Stories
- Appendix C: Use Cases
- Appendix D: Non Functional Requirements
- Appendix E: Glossary
- Appendix F: Instructions for Manual Testing
- F.1. Launch and Shutdown
- F.2. Importing data
- F.3. Exporting Schedules
- F.4. Adding an entity manually
- F.5. Editing an entity
- F.6. Deleting an entity
- F.7. Displaying different views from the Scheduler
- F.8. Scheduling Interviews
- F.9. Emailing an Interviewee
- F.10. Emailing all Interviewees
- F.11. Getting the status of the email sending process
1. Setting up
Refer to the guide here.
2. Design
2.1. Architecture
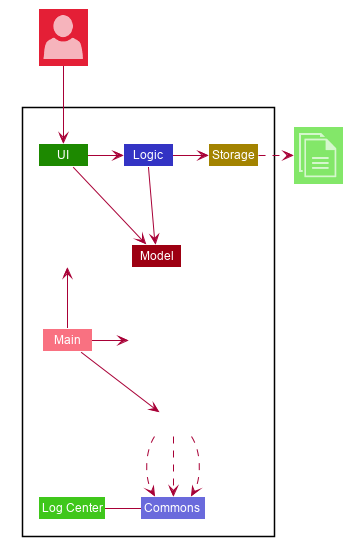
The Architecture Diagram given above explains the high-level design of the App. Given below is a quick overview of each component.
The .puml files used to create diagrams in this document can be found in the diagrams folder.
Refer to the Using PlantUML guide to learn how to create and edit diagrams.
|
-
At app launch: Initializes the components in the correct sequence, and connects them up with each other.
-
At shut down: Shuts down the components and invokes cleanup method where necessary.
Commons represents a collection of classes used by multiple other components.
The following class plays an important role at the architecture level:
-
LogsCenter: Used by many classes to write log messages to the App’s log file.
The rest of the App consists of four components.
Each of the four components
-
Defines its API in an
interfacewith the same name as the Component. -
Exposes its functionality using a
{Component Name}Managerclass.
For example, the Logic component (see the class diagram given below) defines it’s API in the Logic.java interface and exposes its functionality using the LogicManager.java class.
How the architecture components interact with each other
The Sequence Diagram below shows how the components interact with each other for the scenario where the user issues the command clear.
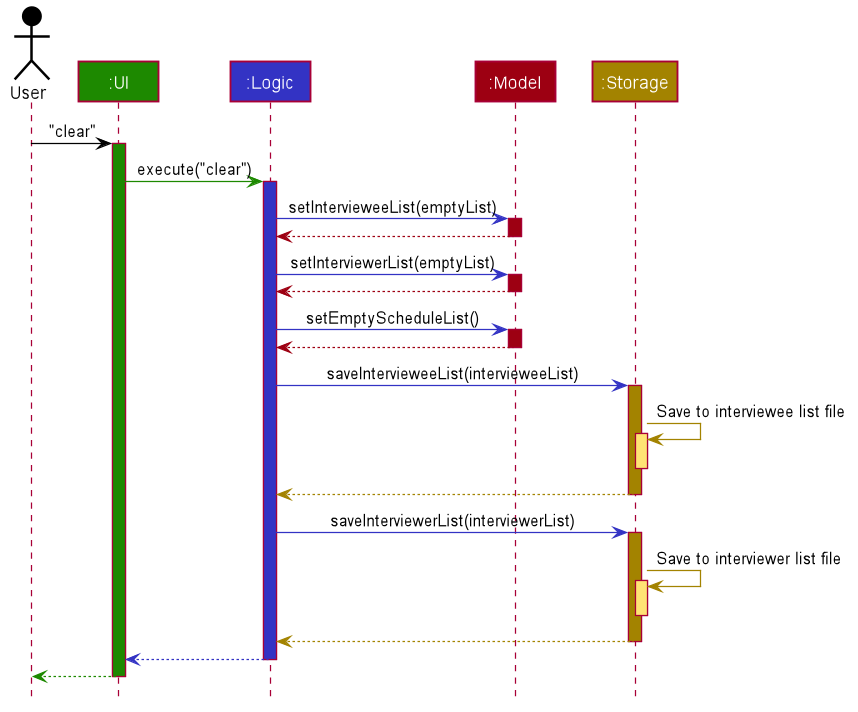
clear commandThe sections below give more details of each component.
2.2. UI component
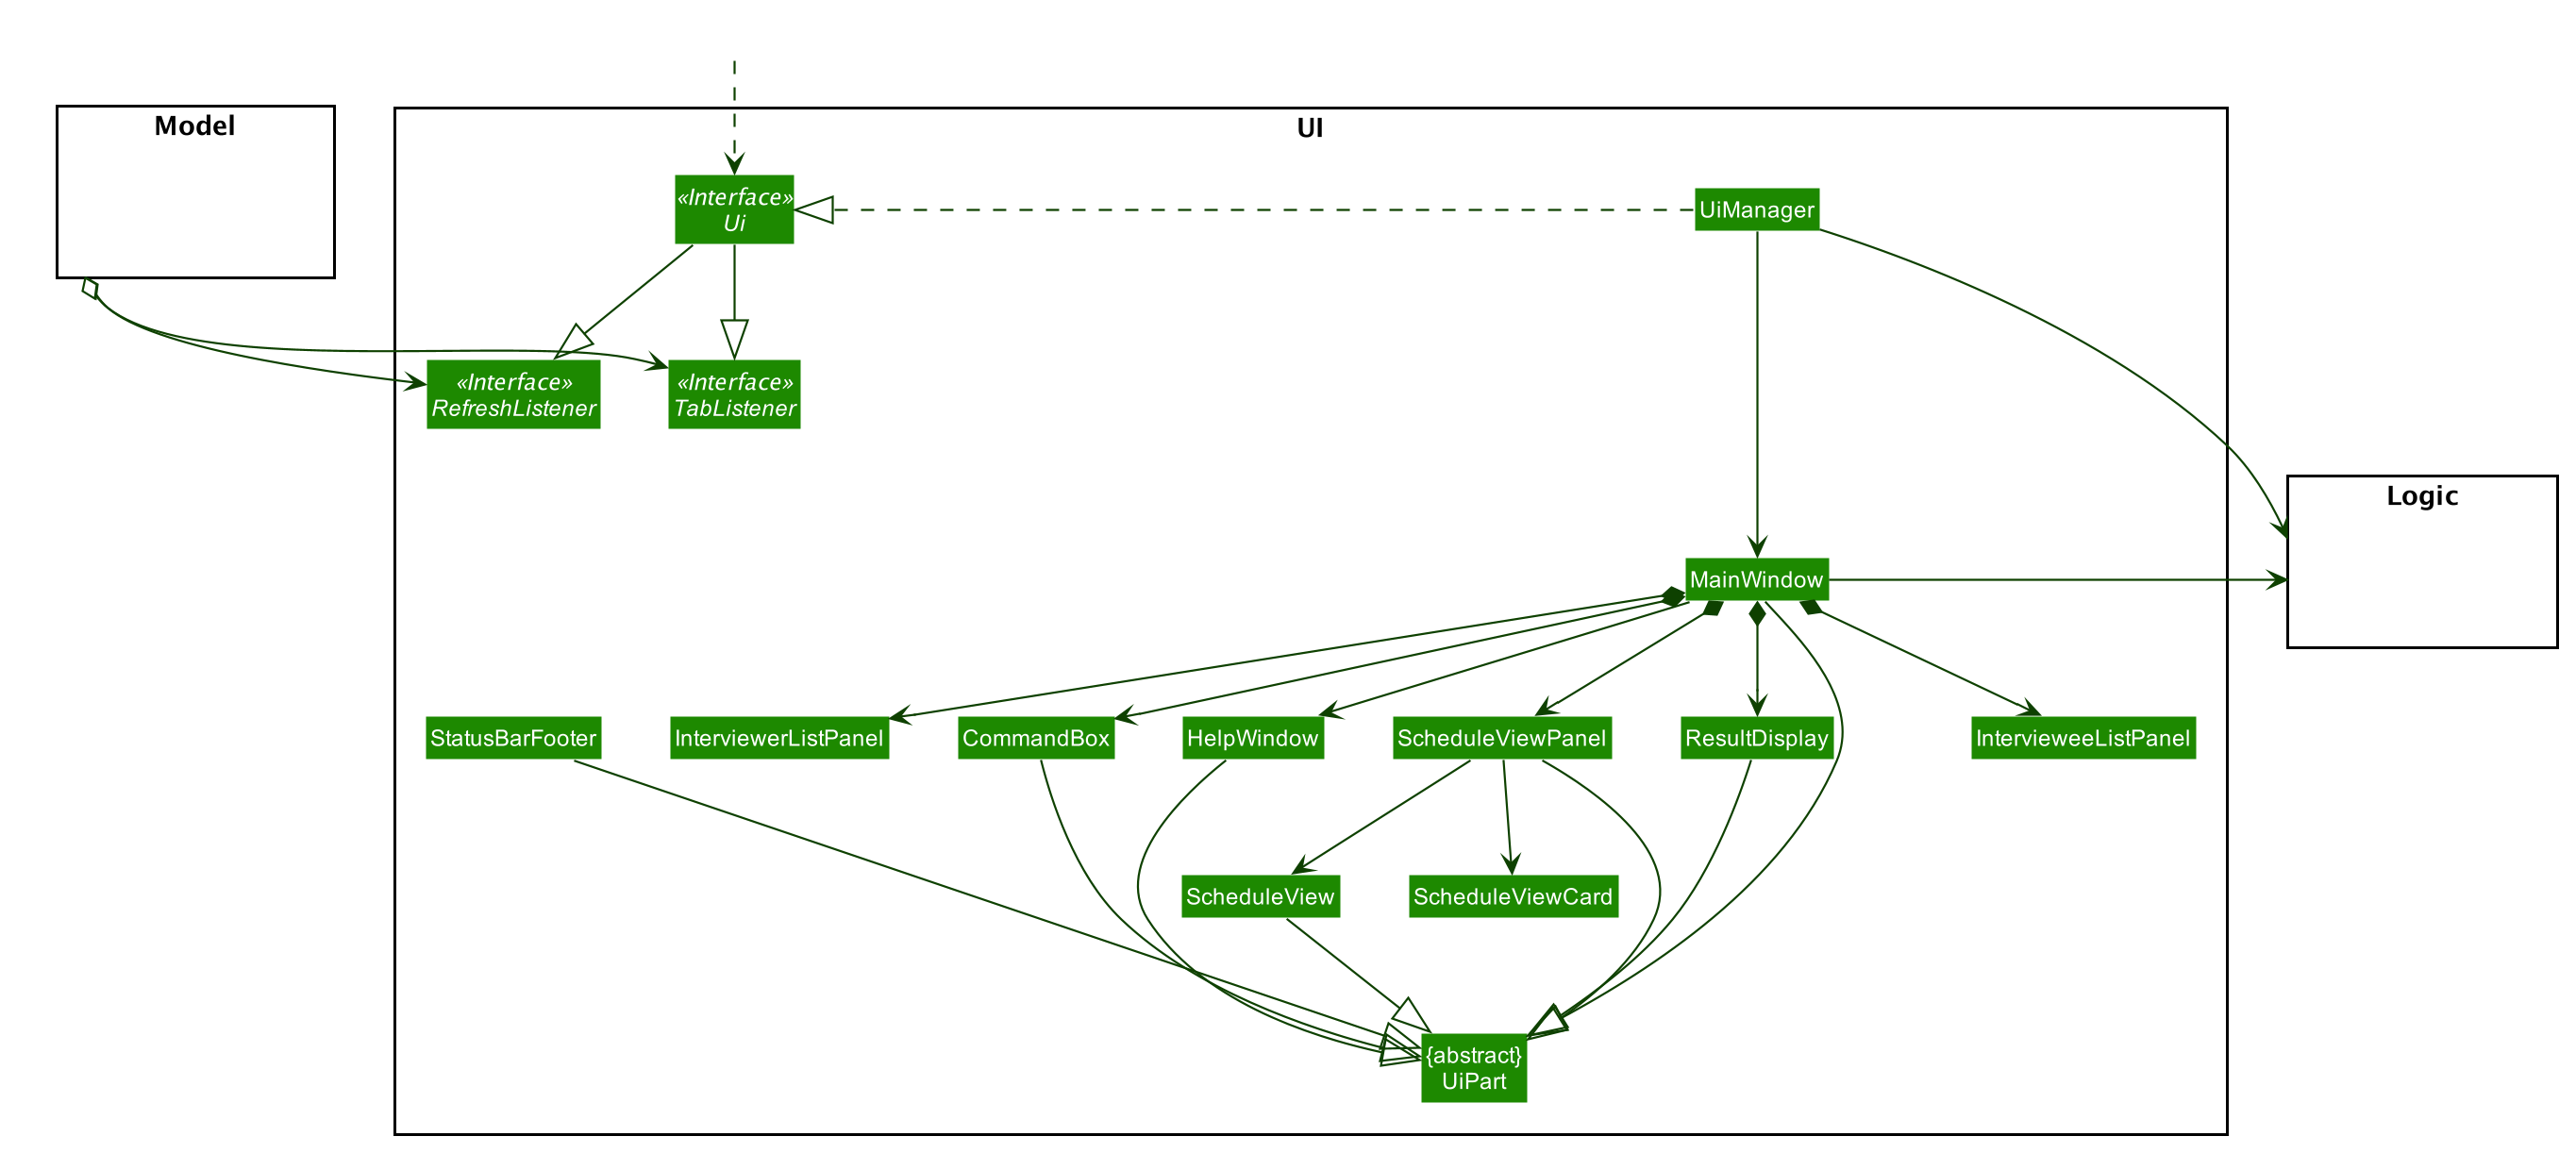
API : Ui.java
The UI consists of a MainWindow that is made up of parts e.g.CommandBox, ResultDisplay, PersonListPanel, StatusBarFooter etc. All these, including the MainWindow, inherit from the abstract UiPart class.
The UI component uses JavaFx UI framework. The layout of these UI parts are defined in matching .fxml files that are in the src/main/resources/view folder. For example, the layout of the
MainWindow is specified in MainWindow.fxml
The UI component,
-
Executes user commands using the
Logiccomponent. -
Listens for changes to
Modeldata so that the UI can be updated with the modified data.
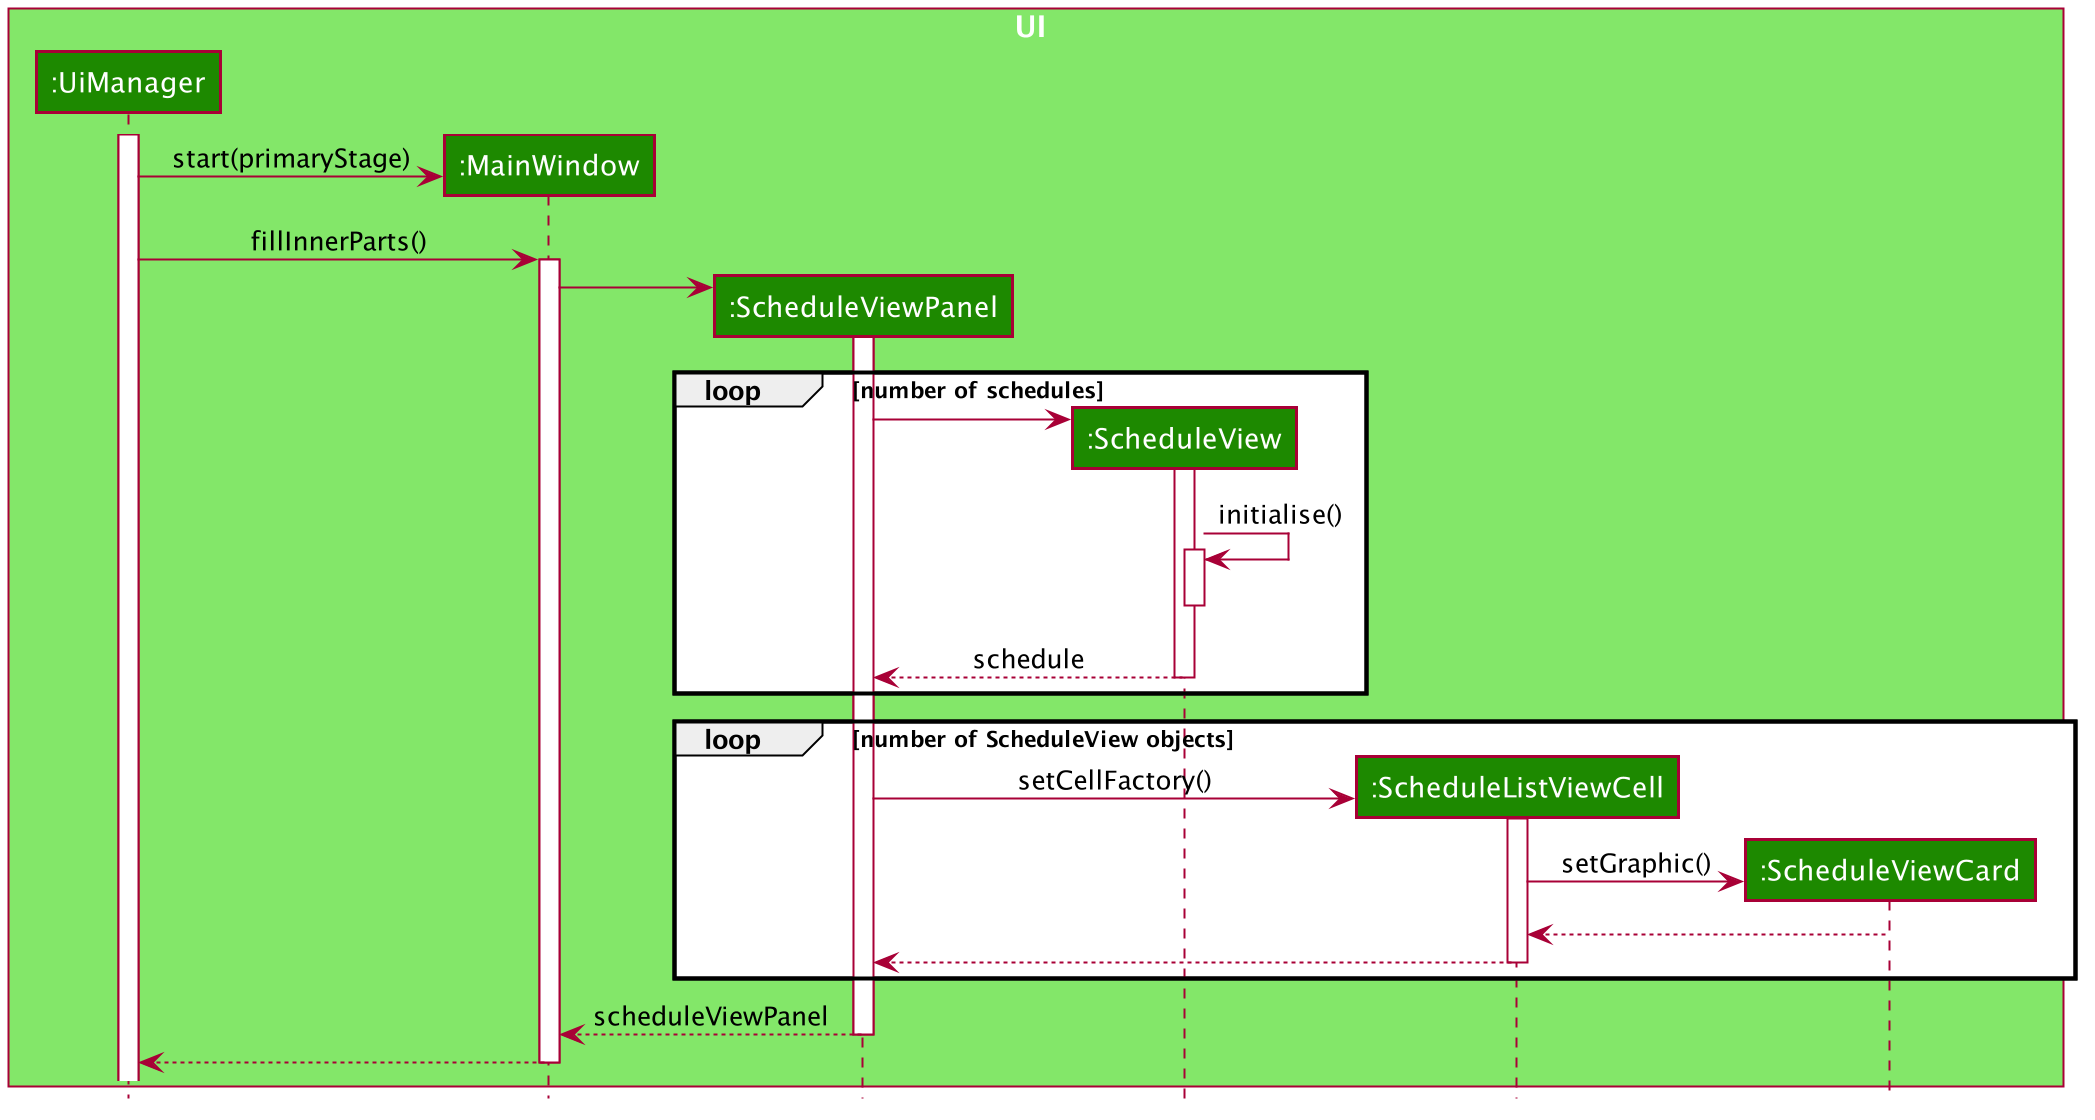
2.2.1. Schedule View
The display schedule feature extends Scheduler to display multiple tables of schedule per day. It is a component in the MainWindow class
stored in a ScheduleViewPanel class. Within the ScheduleViewPanel class, objects of ScheduleView class are stored into the panel.
ScheduleViewPanel implements the following function:
*fillPanel() — Fill the ScheduleView component with the schedule tables for each day.
Given below is an example scenario of what will be displayed to the user.
-
Step 1. The user launches the application. The Ui will start and the MainWindow will be displayed first.
-
Step 2. MainWindow will call all the children such as the HelpWindow, CommandBox, Result Display, StatusBarFooter, ScheduleViewPanel, IntervieweeListPanel and InterviewerListPanel.
-
Step 3. Once ScheduleViewPanel is called, it will take in a list of titles and ObservableList data from the Logic class. The list of titles consist of the title column for each schedule table and the ObservableList data consists of the time slots allocated to each interviewee.
-
Step 4. ScheduleViewPanel will call the ScheduleView class to fill each table and populate each table with the data given by the Logic class.
-
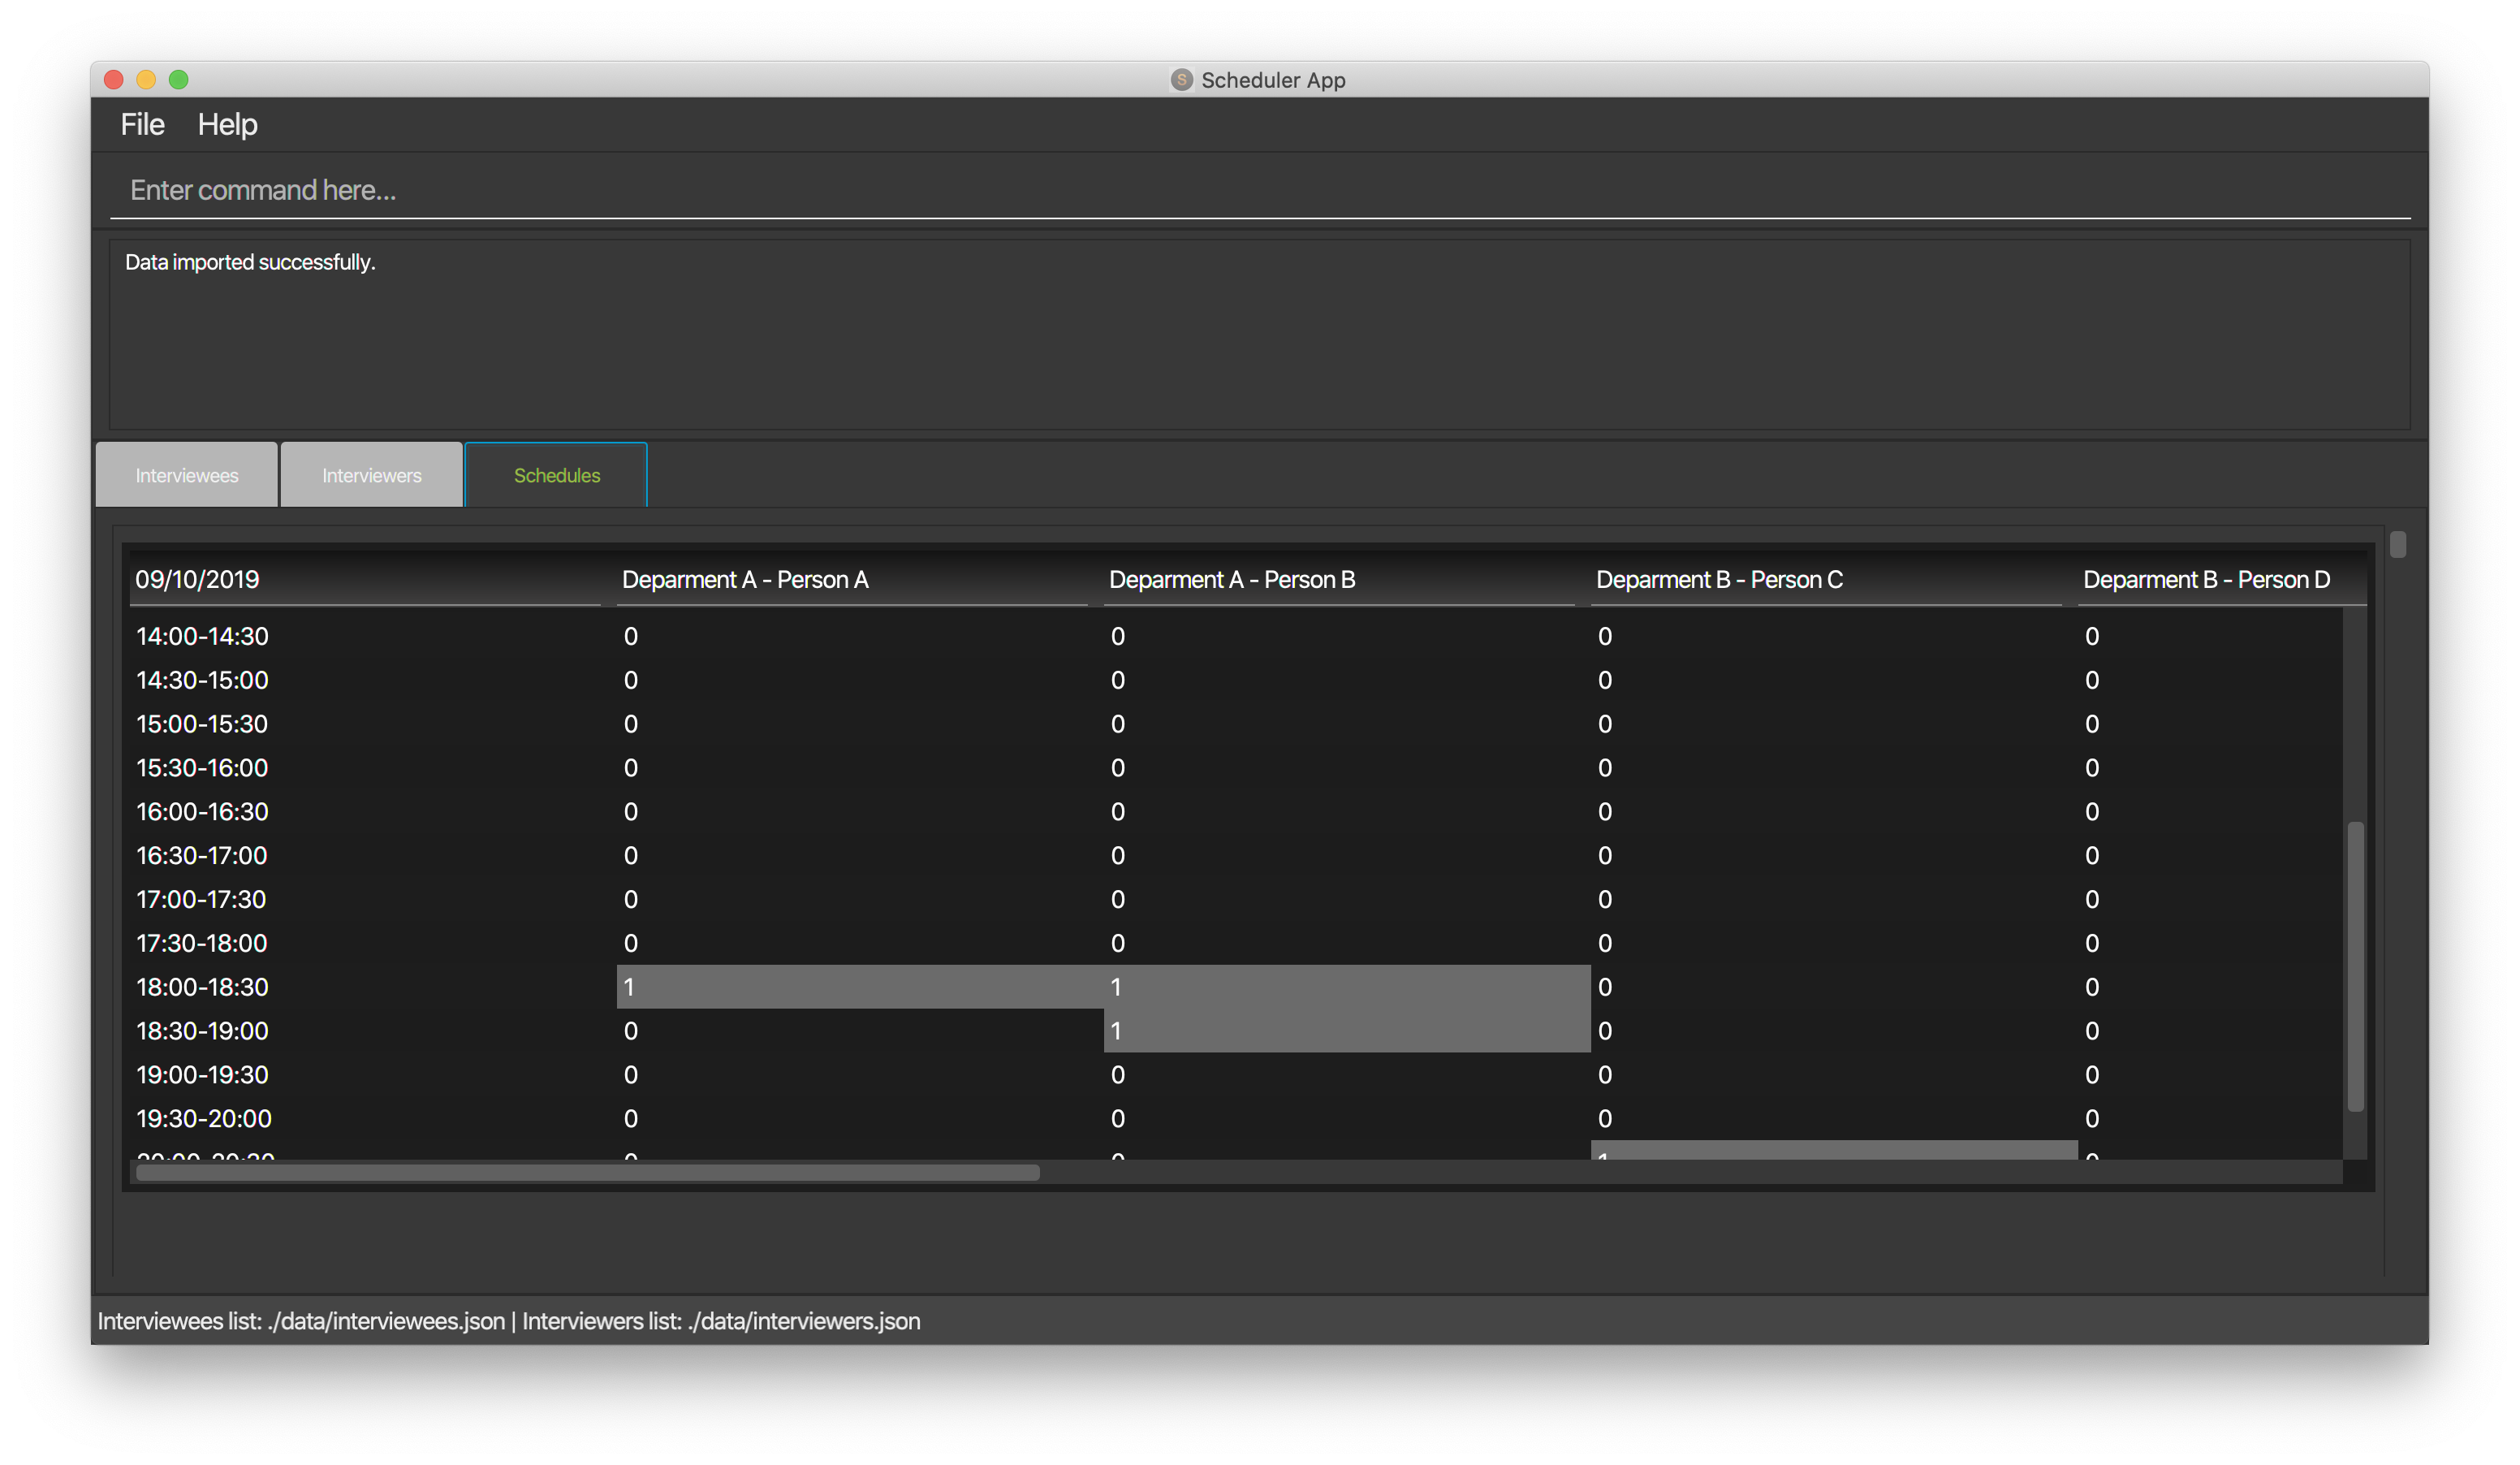
Step 5. ScheduleView will have a .fxml file of a table and it will first be filled with the column titles, followed by the time slots and the interviewee allocated to each time slots. The slot that has no interviewee will be displayed as "0".
-
Step 6. ScheduleViewPanel will call and instantiate the ScheduleView object into a list card.
-
Step 7. Once all the ScheduleView objects are instantiated into the respective list cards, the ScheduleView Panel will form a list of tables containing the schedules of the day.
-
Step 8. The MainWindow class will fill the Ui with the ScheduleViewPanel.
2.2.2. Interviewee/Interviewer List View
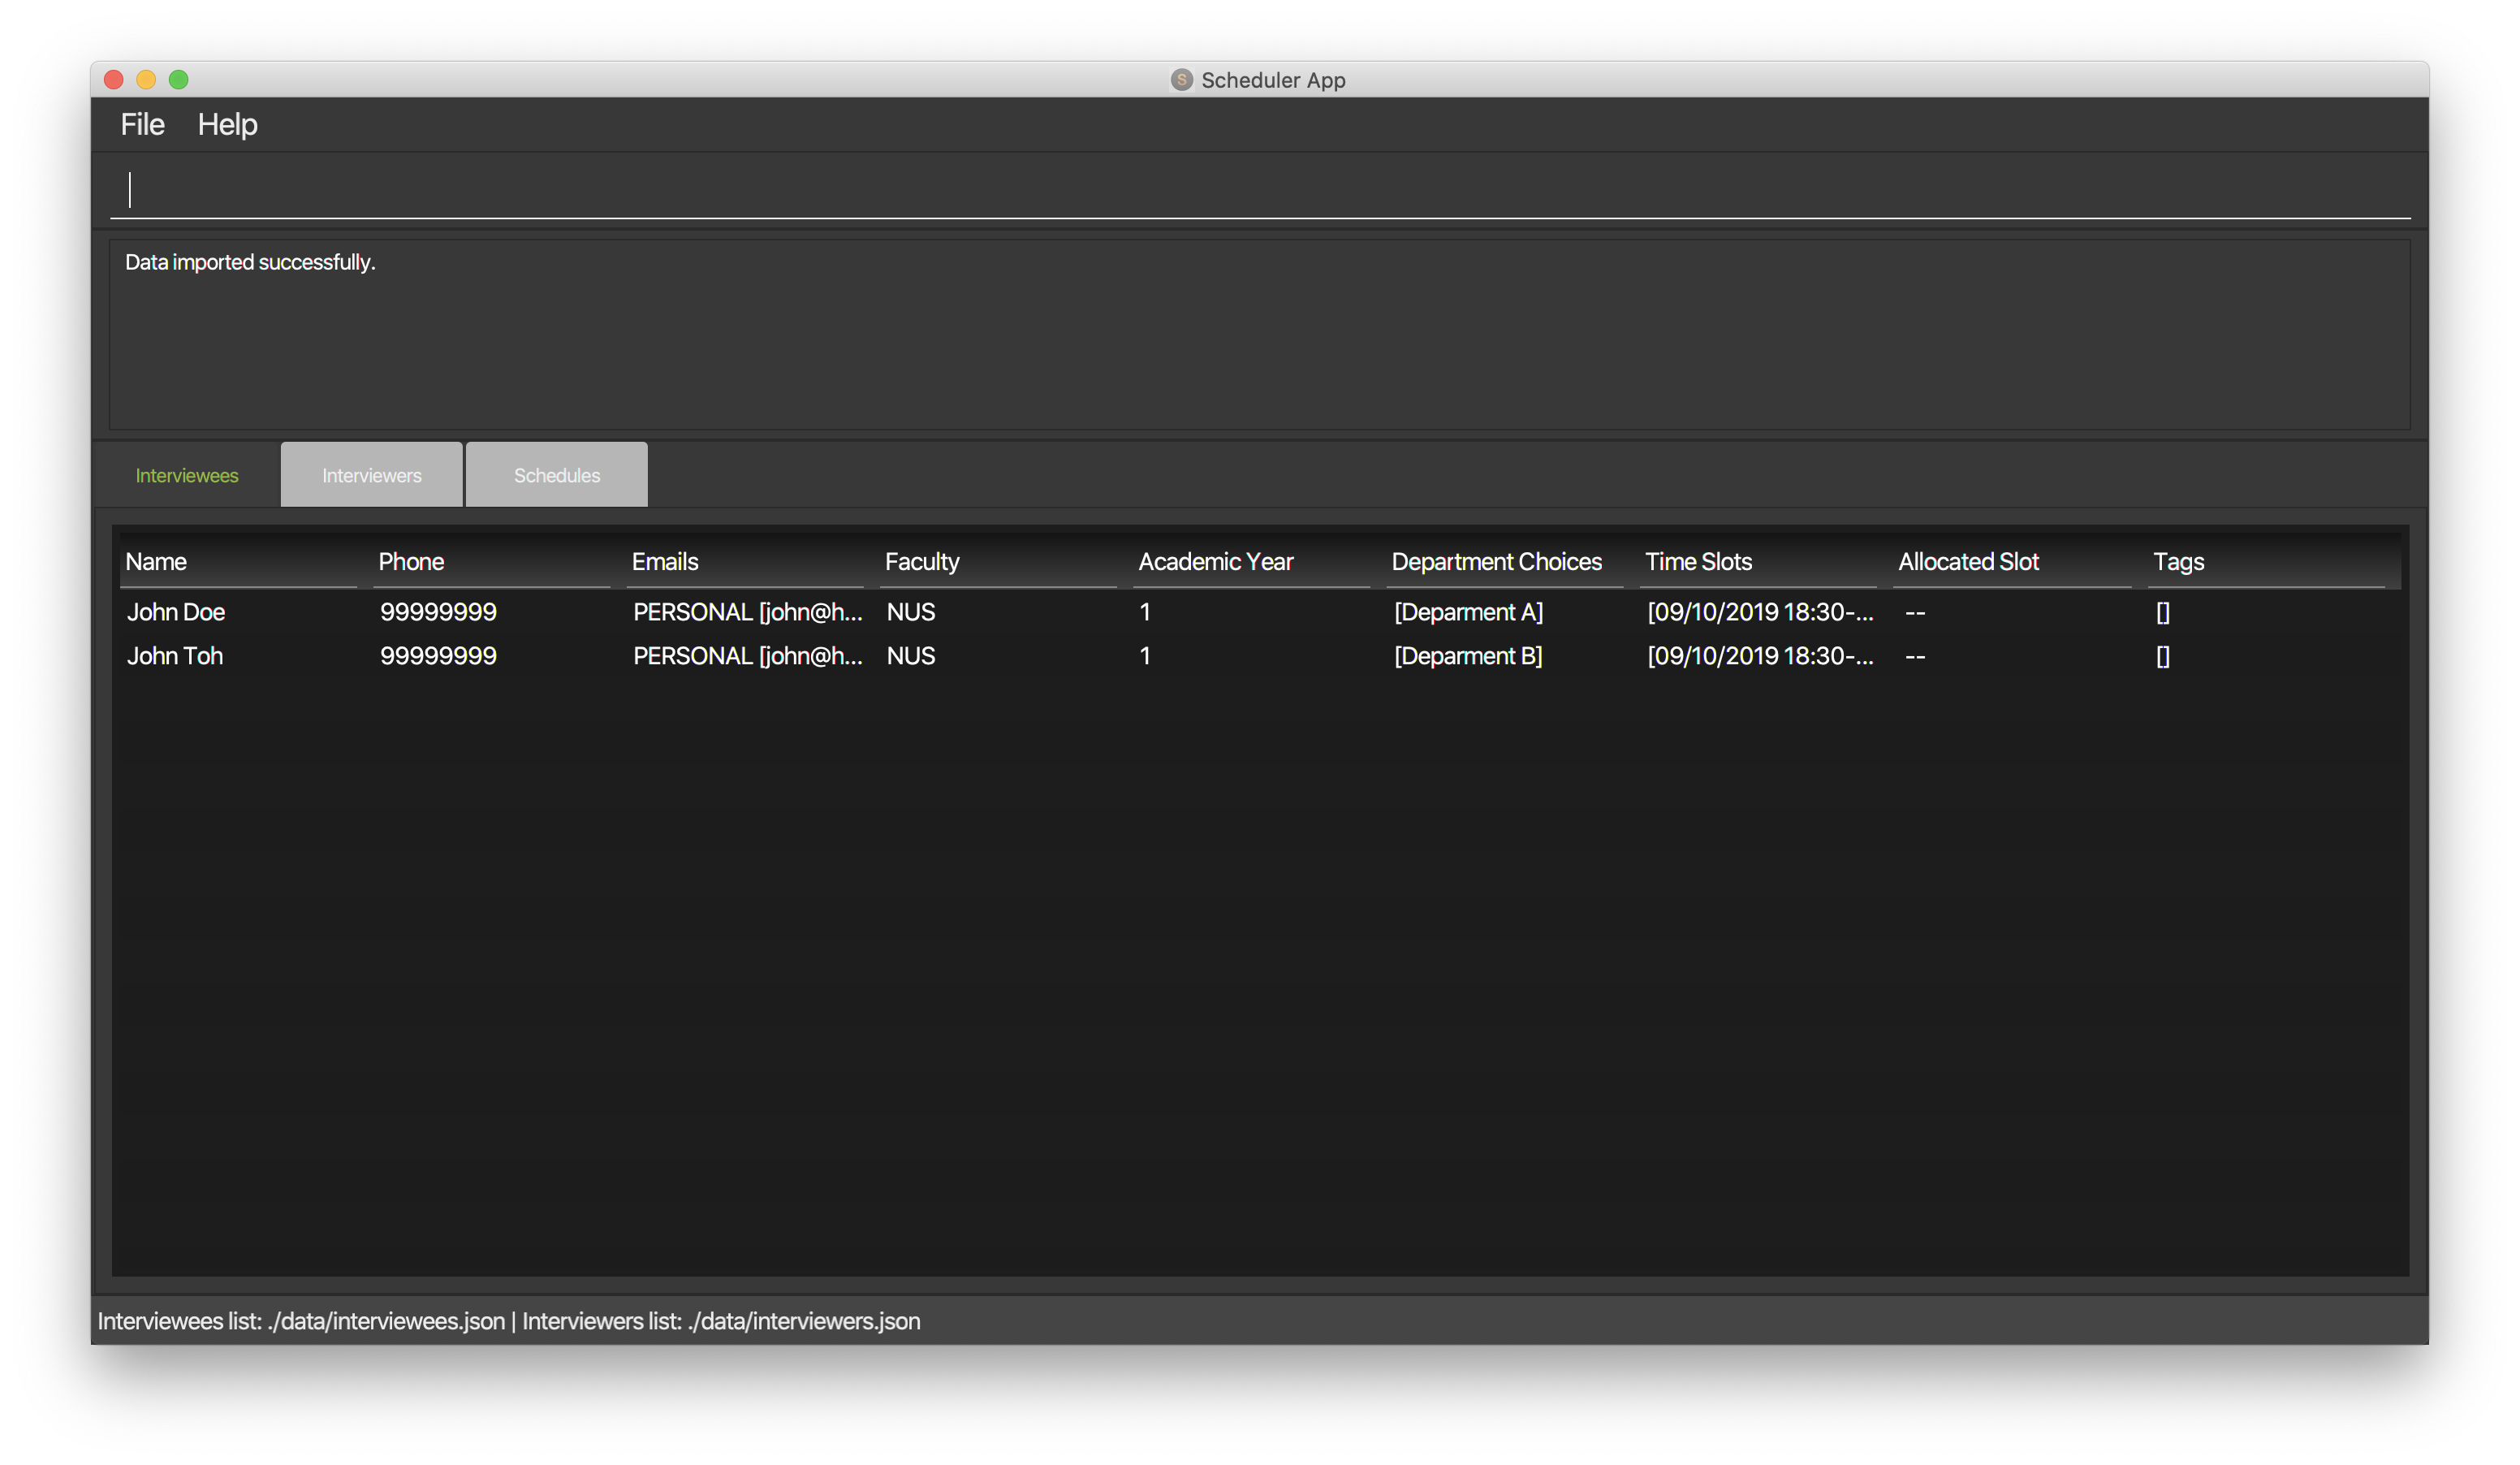
Interviewee list view is generated by the class IntervieweeListPanel to display information of the interviewees. It is a component in the "MainWindow" class. IntervieweeListPanel uses a TableView class to display the information of interviewees in a table format. It contains a static method to populate the table with data:
-
initialise()— To first set the columns, and afterwards fill the columns with the data provided.
Interviewee list will provide the following information: * 1. Name * 2. NUS/Personal emails * 3. Faculty * 4. Academic Year * 5. Department Choice * 6. Available Time Slots * 7. Allocated Time Slot * 8. Tags
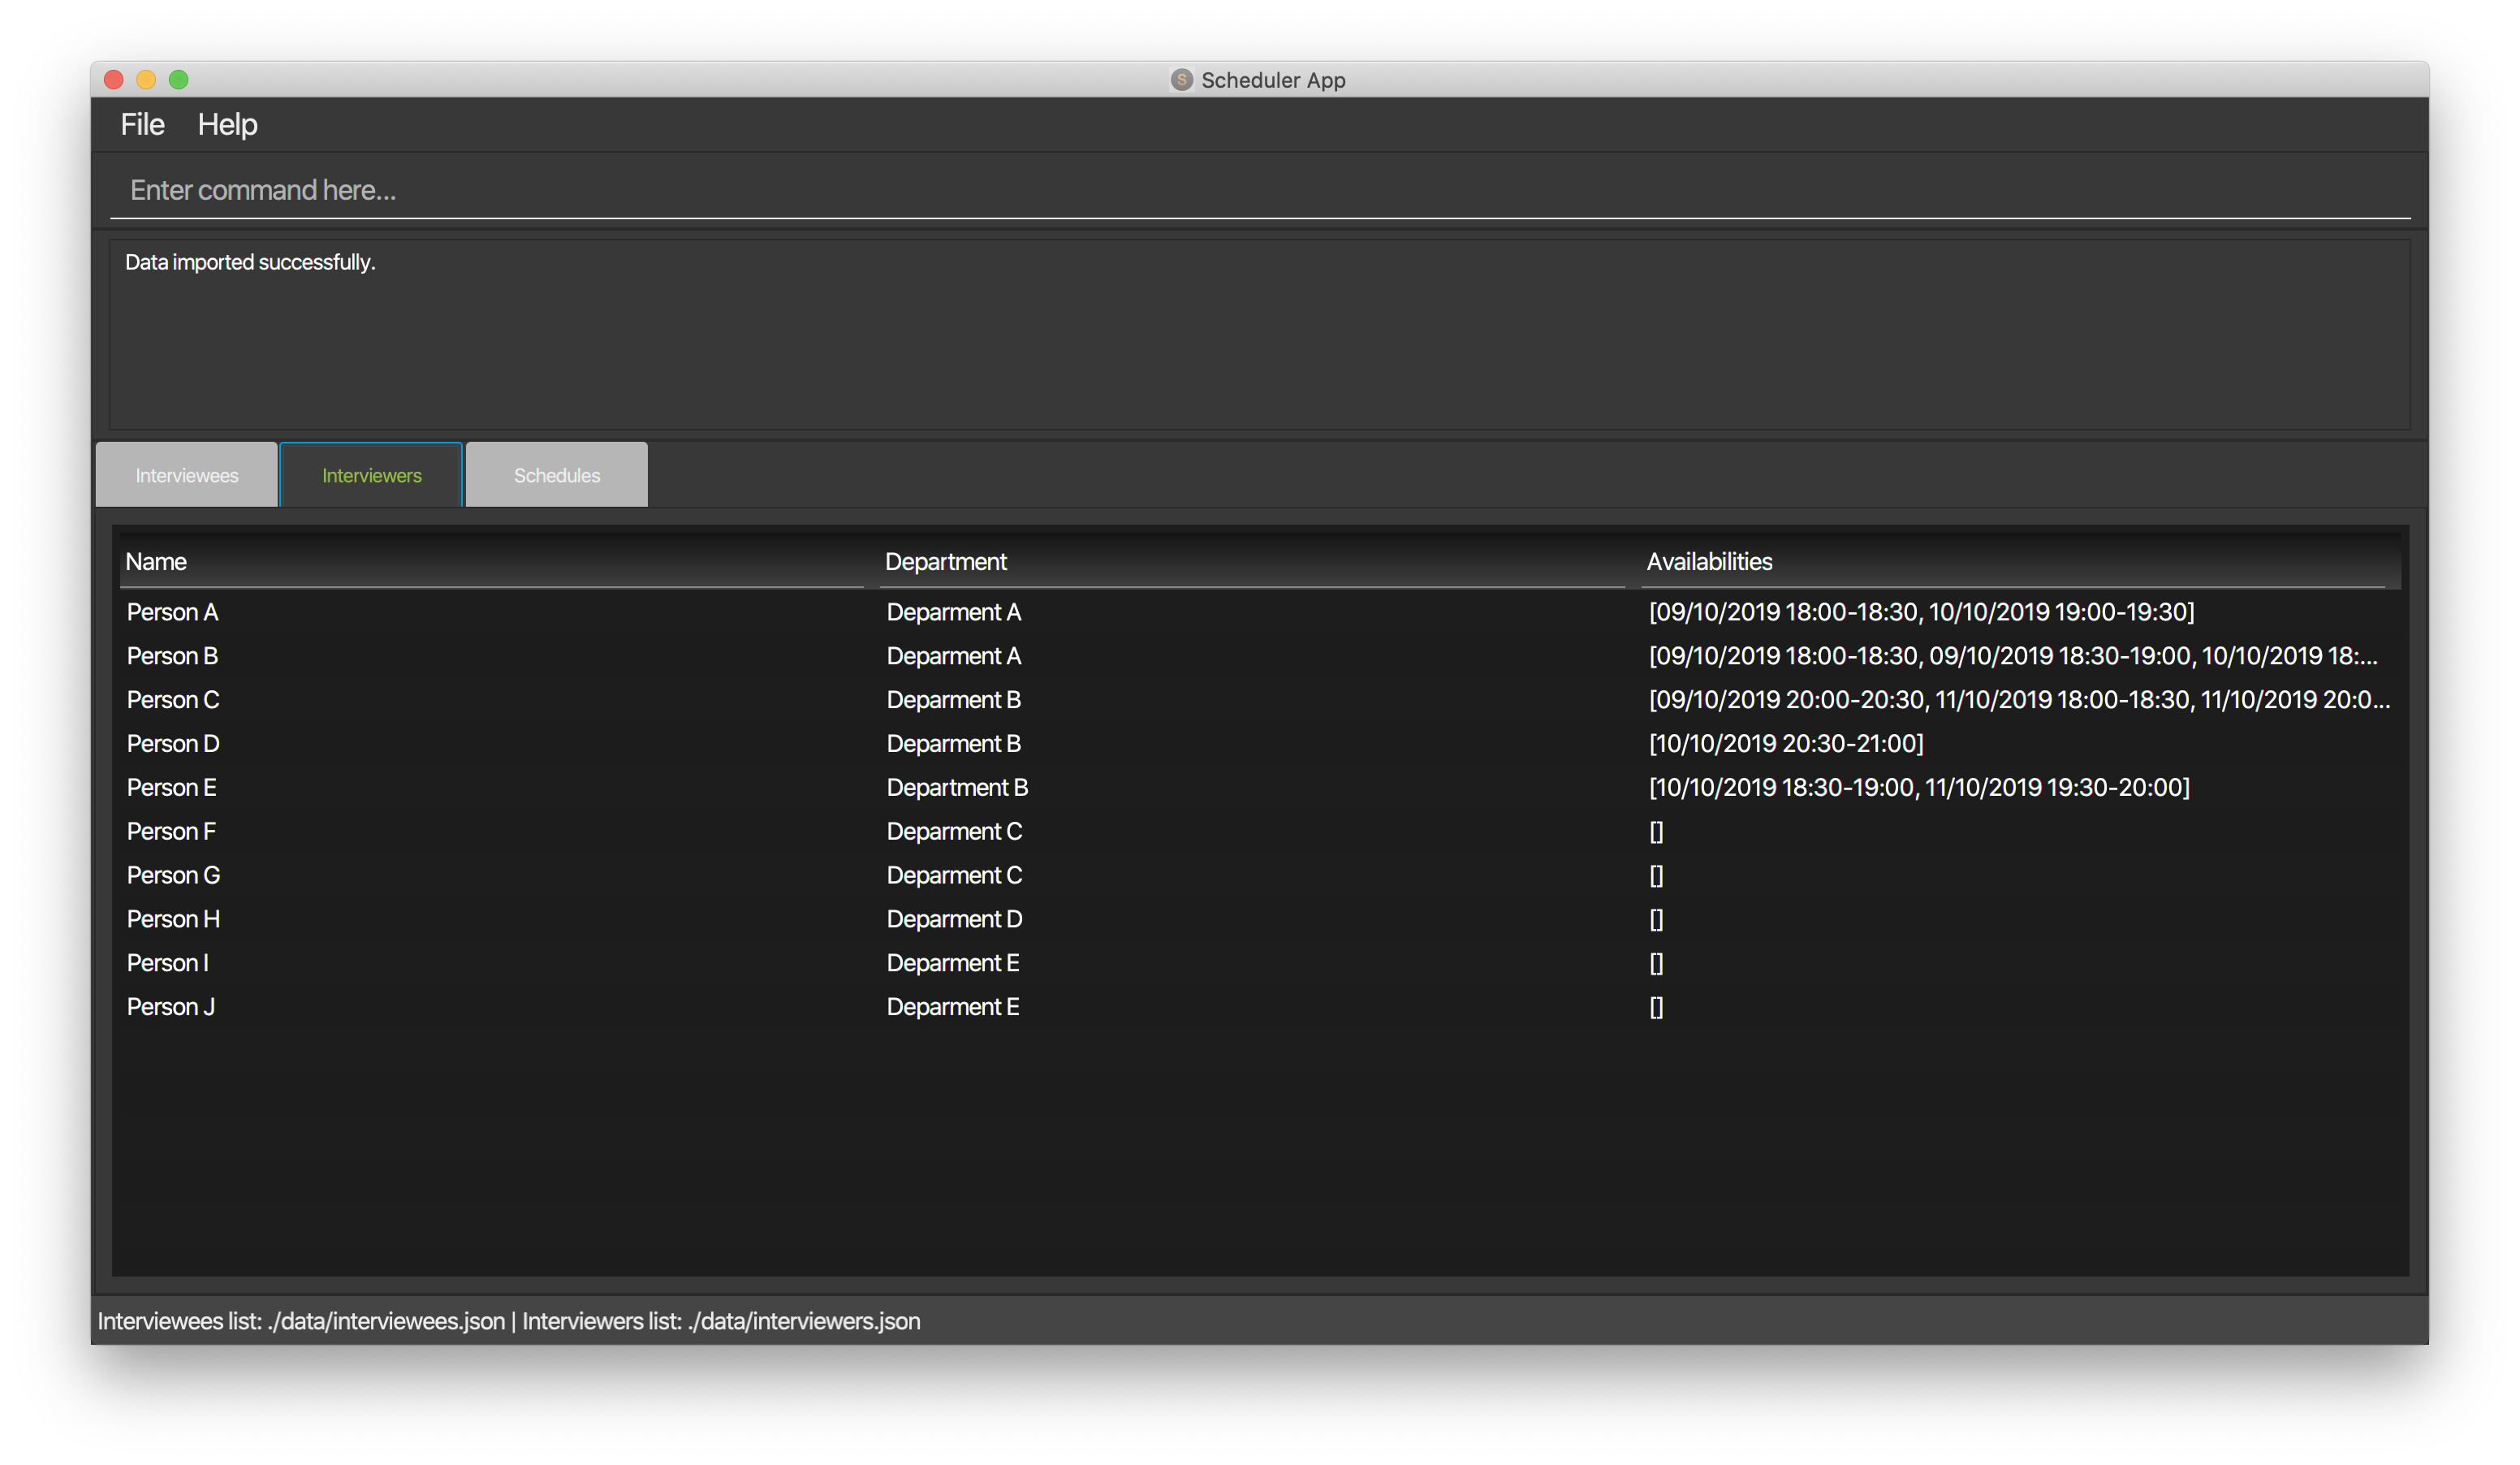
Interviewer list view has the similar steps of displaying information of the interviewers. The difference is in the details of the interviewers.
The interviewer list will provide the following information:
-
1. Name
-
2. Department
-
3. Available Time Slots
Given below is a scenario of how the IntervieweeListPanel/InterviewerListPanel is filled.
-
Step 1. The user launches the application. The Ui will start and the MainWindow will be displayed first.
-
Step 2. MainWindow will call all the children such as the HelpWindow, CommandBox, Result Display, StatusBarFooter, ScheduleViewPanel, IntervieweeListPanel and InterviewerListPanel.
-
Step 3. Once IntervieweeListPanel is called, it will take in an ObservableList data from the Logic class. It contains all the information of the list of interviewees
-
Step 4. The class will initialise, setting the necessary columns.
-
Step 5. Using the method
setItems()from the tableView, data will be populated to their respective columns and form the interviewee list.
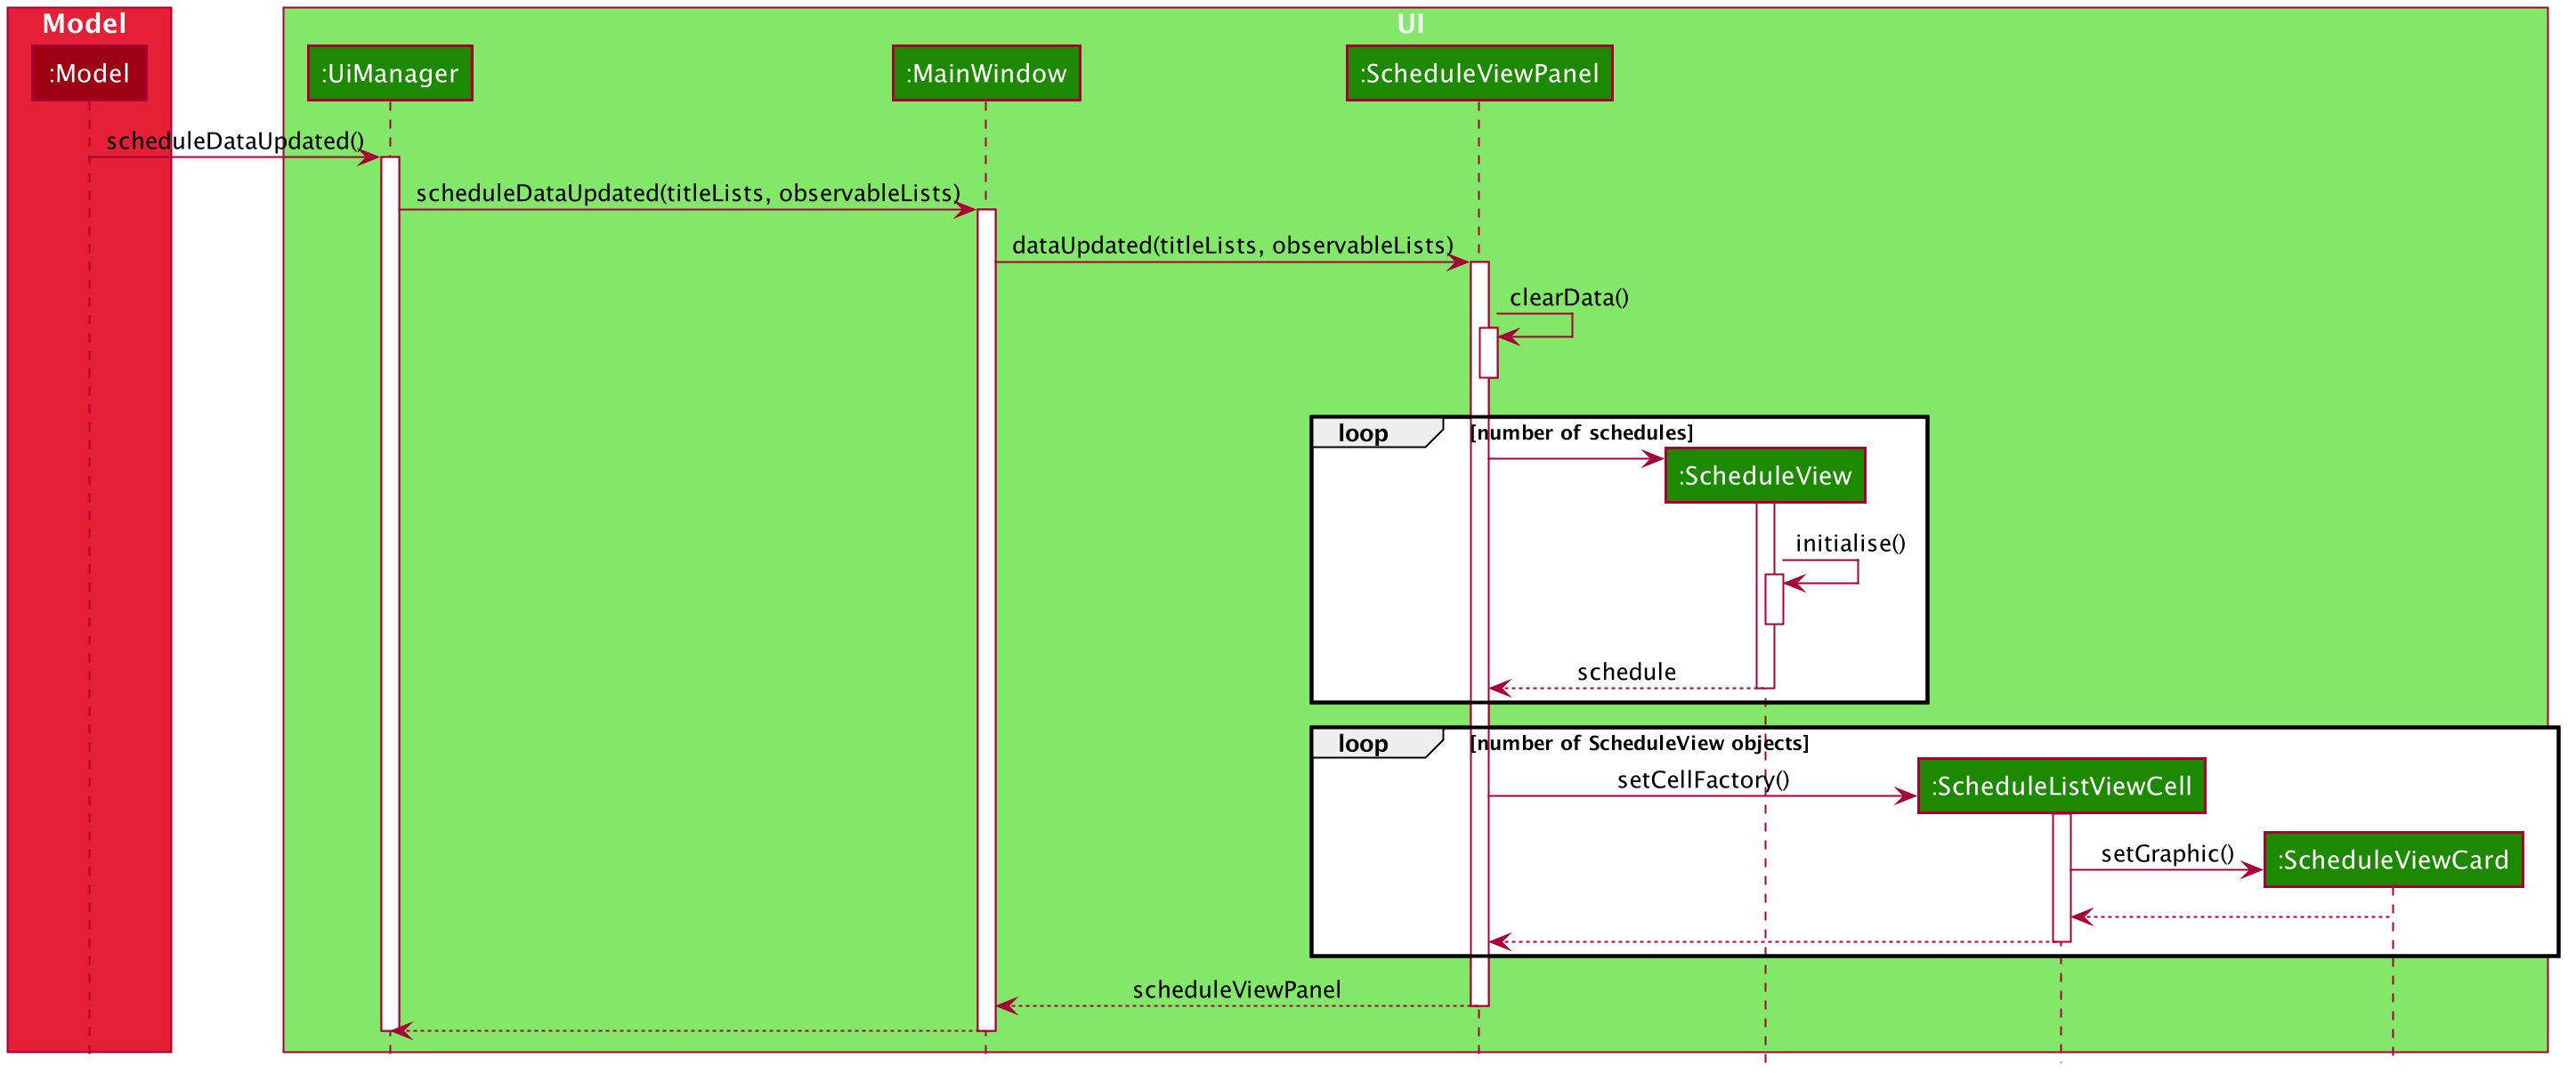
2.2.4. UI Refresh During Data Import
-
Step 1. Once User imports a new .csv file, it will call the RefreshListener Interface.
-
Step 2. UiManager will receive this method through the RefreshListener, thus calling dataUpdated to MainWindow class.
-
Step 3. The RefreshListenerManager will call the MainWindow to refresh the ScheduleViewPanel.
-
Step 4. ScheduleViewPanel will firstly clear all the data and input the updated data from the .csv file.
-
Step 5. ScheduleViewPanel object will then be returned to the MainWindow and display the updated data.
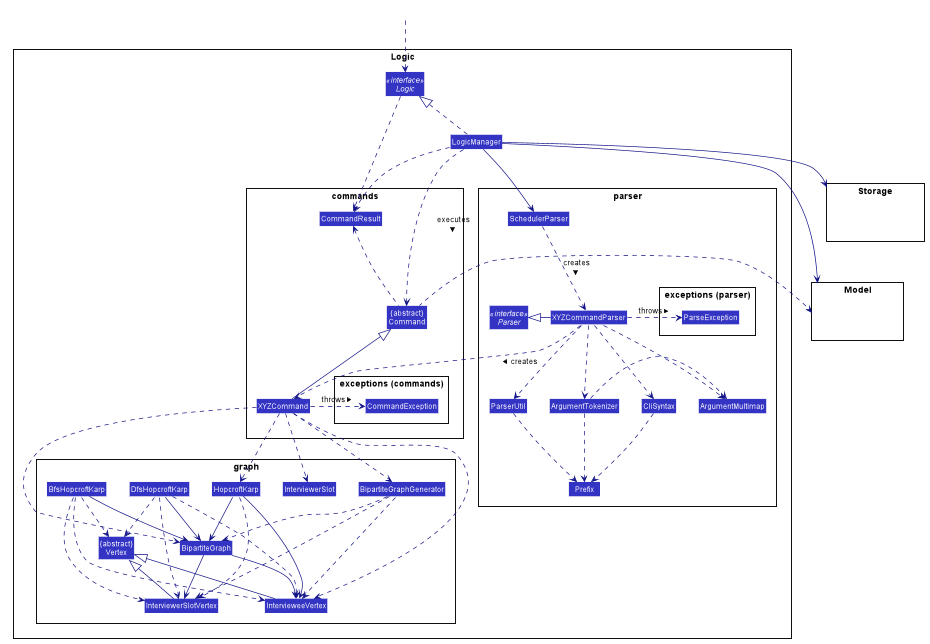
2.3. Logic component
This section shows how the Logic component is structured. The class diagram below shows an overview of the Logic component:
-
XYZinXYZCommandcan either be: Add, Edit, Delete, Clear, Exit, Help, Import, Export, Email, Schedule or Display. -
XYZinXYZCommandParsercan either be Add, Edit, Delete, Import, Export, Email, Schedule or Display. -
The dependencies of
XYZCommandwith thegraphpackage shown in the Class Diagram only applies toScheduleCommand.
API :
Logic.java
The Logic component mainly handles the parsing of user input and creation of commands to execute, which in turn affects
the Model and Storage components.
A command entered by the user is processed as follows:
-
Logicuses theSchedulerParserclass to parse the user command, producing aCommandobject. -
This
Commandobject is executed byLogicManager, which may affectModel(e.g adding an interviewee). -
The execution produces a result, which is encapsulated in a
CommandResultobject and returned toLogicManager. -
LogicManagerthe processes theCommandResult. TheCommandResultcan instruct toUito perform certain actions, such as displaying help to the user. -
Finally,
LogicManagercalls theStoragecomponent to save the currentModelto the hard disk.
Given below is the general Sequence Diagram for interactions within the Logic component for the execution of the add,
edit and delete API calls. Refer to Section 3: Implementation for how different Command objects
are executed and how they influence other components.
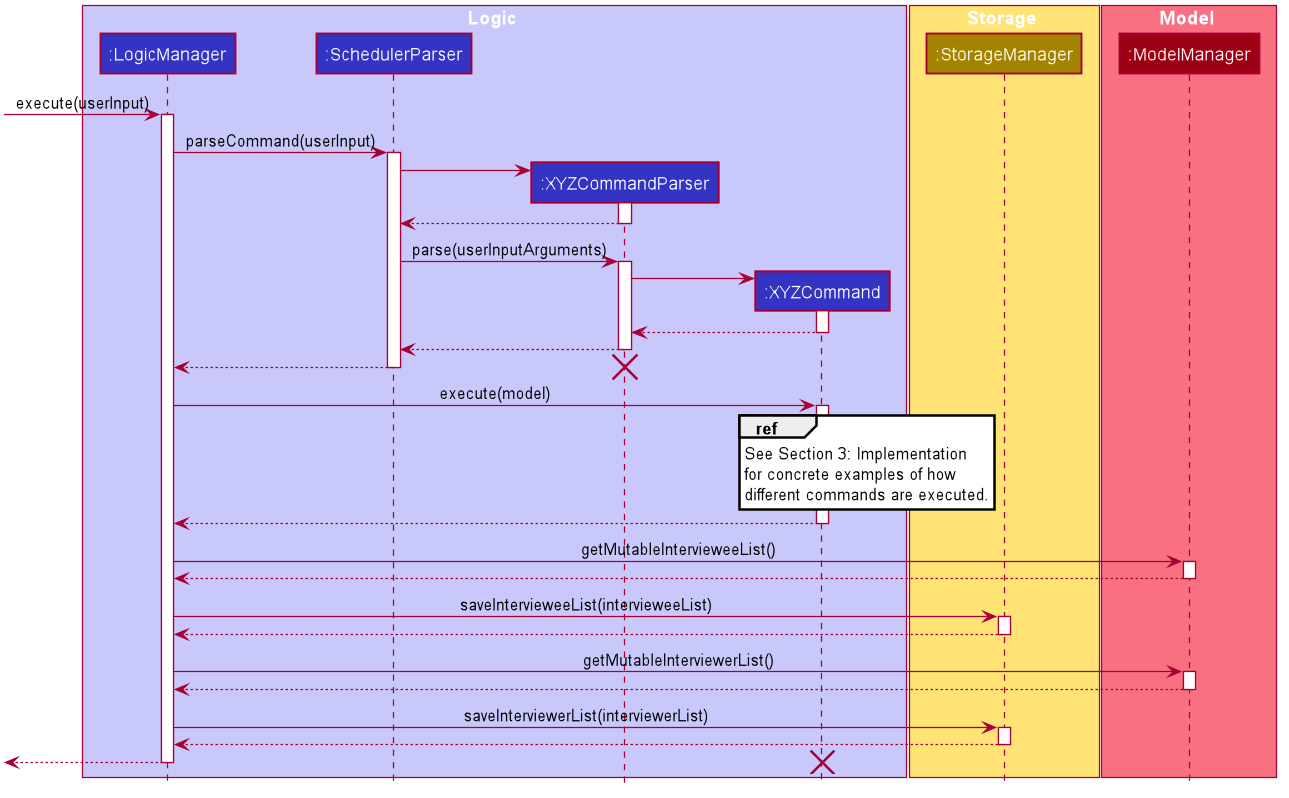
add, edit and delete Commands
The lifeline for XYZCommandParser and XYZCommand should end at the destroy marker (X) but due to a limitation of PlantUML, the lifeline reaches the end of diagram.
|
2.4. Model component
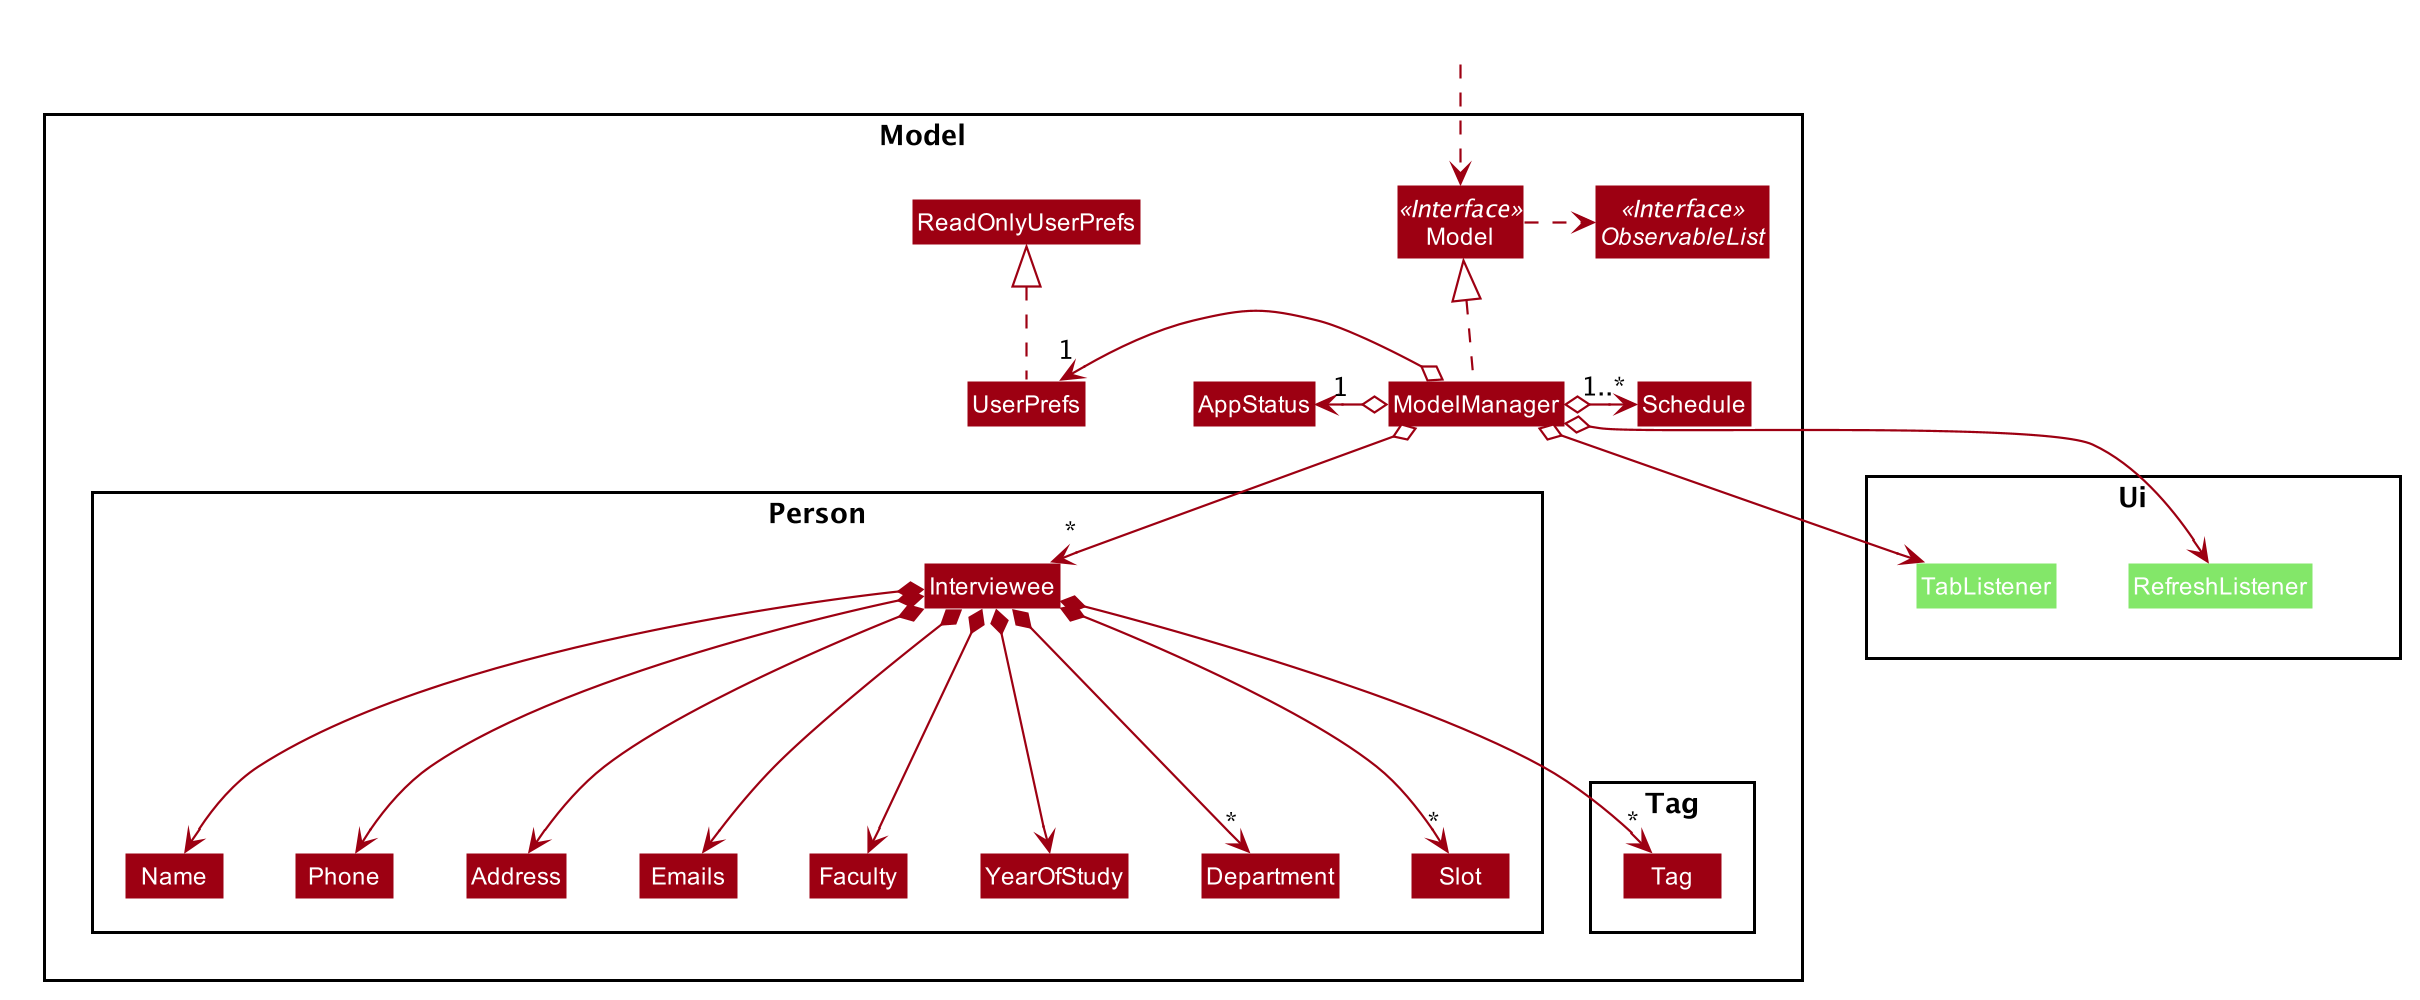
API : Model.java
The Model,
-
stores an
AppStatussingleton object which encapsulates the state of the application. -
stores a
UserPrefobject that represents the user’s preferences. -
stores a list of
Schedule. EachSchedulerepresents a schedule timetable. -
stores a
RefreshListenerto refresh the displayed schedules in the UI indirectly when the data of interviewers, interviewees, or the schedules changes. -
stores a
TabListenerto refresh the tabs in the UI when data changes. -
exposes a list of
ObservableList<ObservableList<String>>that can be 'observed' by the UI. Each of theObservableList<ObservableList<String>>represents the data of aScheduleobject. TheObservableList<ObservableList<String>>objects are bound to the UI so that the UI automatically updates when the data of theScheduleobjects changes. -
exposes a list of
ObservableList<Interviewee>that can be 'observed' by the UI. -
does not depend on any of the three components.
2.4.1. Schedule
The Schedule objects are filled up and created by the imported interviewer’s availability. The inner data of a Schedule object is the same as the corresponding availability
table in the imported interviewer’s availability. The data of the Schedule can be changed after running the scheduling algorithm.
2.5. Storage component
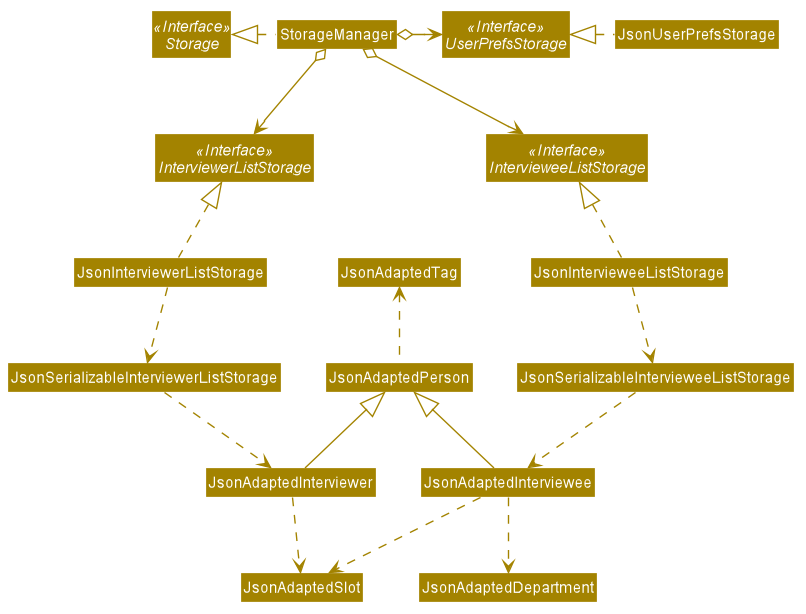
API : Storage.java
The Storage component,
-
can save
UserPrefobjects in json format and read it back. -
can save the list of Interviewees data in json format and read it back.
-
can save the list of Interviewers data in json format and read it back.
2.6. Common classes
Classes used by multiple components are in the seedu.scheduler.commons package.
3. Implementation
This section describes some noteworthy details on how certain features are implemented.
3.1. Add, Edit and Delete feature
The add, edit and delete features allow interviewees and interviewers to be manually added to Scheduler.
The flow of logic for a successful execution of these commands can be summarised as follows:
-
Parse user input and populate an
ArgumentMultimapinstance with a mapping of prefixes (from user input) to String arguments following those prefixes. -
Check the validity of these arguments using the
ParserUtilclass. -
If the arguments are valid, carry out the necessary modifications to the
ModelManagerclass, which contains the underlyingIntervieweeListandInterviewerList, which we store our entities in.
The Activity Diagram below further illustrates the general flow of logic from command input (by a user) to command execution:
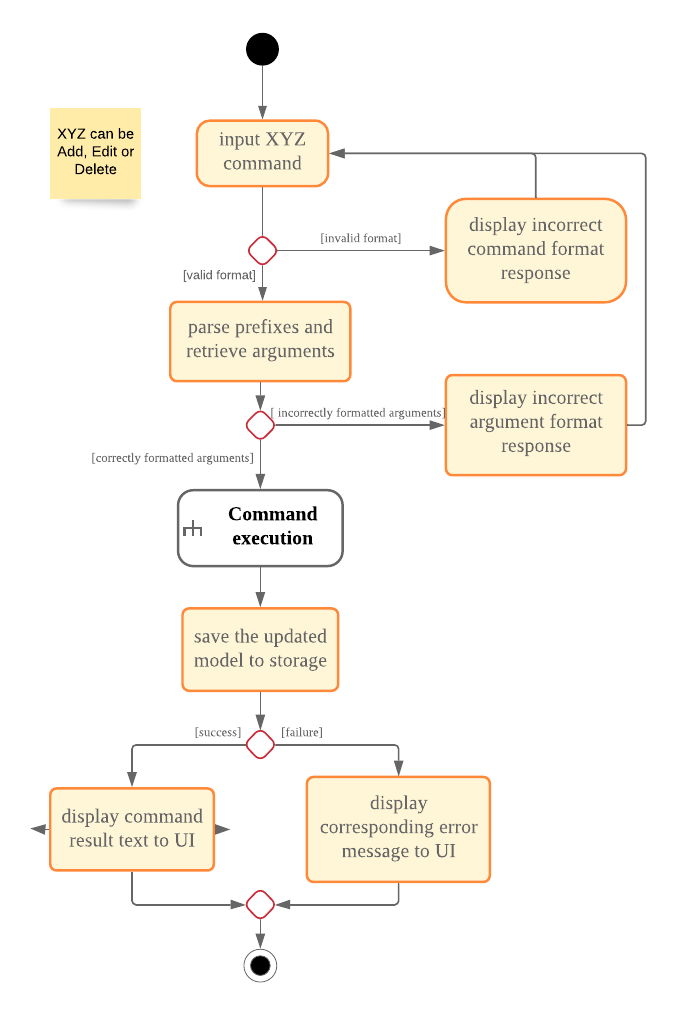
Logic component.| The box labelled "Command execution" is a rake. It indicates that part of the activity is given as a separate diagram. Each of add, edit and delete provide their own versions of "Command execution". |
3.1.1. Add Interviewee/Interviewer feature
The add command feature allows a user to add an Interviewee or Interviewer object to the underlying IntervieweeList
or InterviewerList of ModelManager.
-
Upon successful parsing of the
addcommand arguments, an instance ofInterviewee/Intervieweris created. (depending on the preamble supplied in the user input)-
I.e:
add interviewee n/John Doe. The preamble starts after the command word "add" and before the first prefix "n/".
-
-
ModelManager#addInterviewee() is then called to add the entity to its corresponding list in
ModelManager.-
The underlying
UniquePersonListofIntervieweeListandInterviewerListensures that no duplicate entities are present at any time, checked by Interviewee#isSamePerson() and Interviewer#isSamePerson().
-
The following Sequence Diagram illustrates how the add interviewee command works. The add interviewer command works in a similar manner.
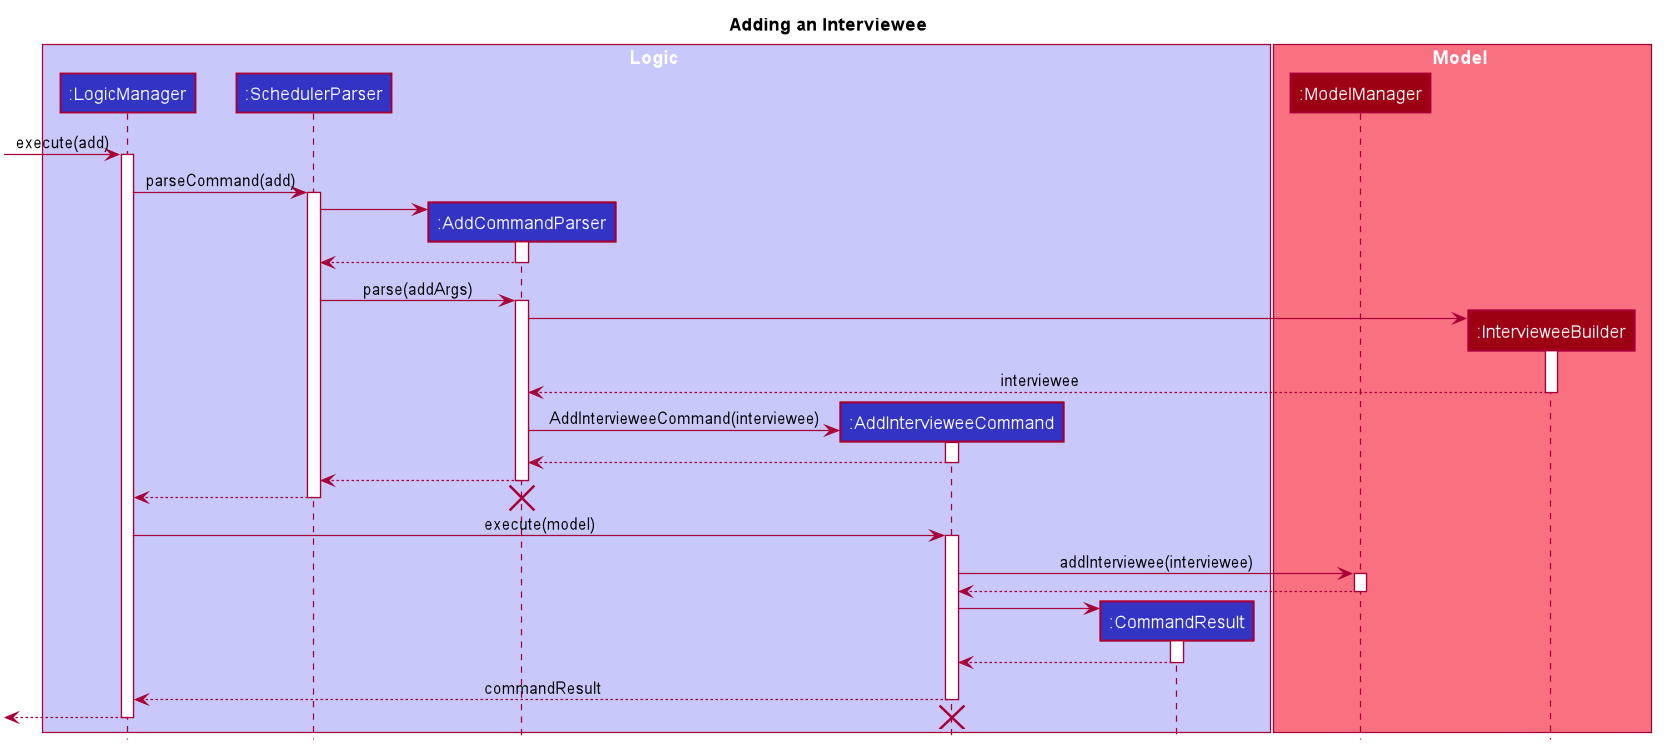
The lifeline for AddCommandParser and AddIntervieweeCommand should end at the destroy marker (X) but due to a limitation of PlantUML, the lifeline reaches the end of diagram.
|
-
See the general logic diagram in Section 2.3: Logic component for a more complete view of how
Storageis affected as well. -
For brevity, the input arguments to functions referenced in this guide may be omitted.
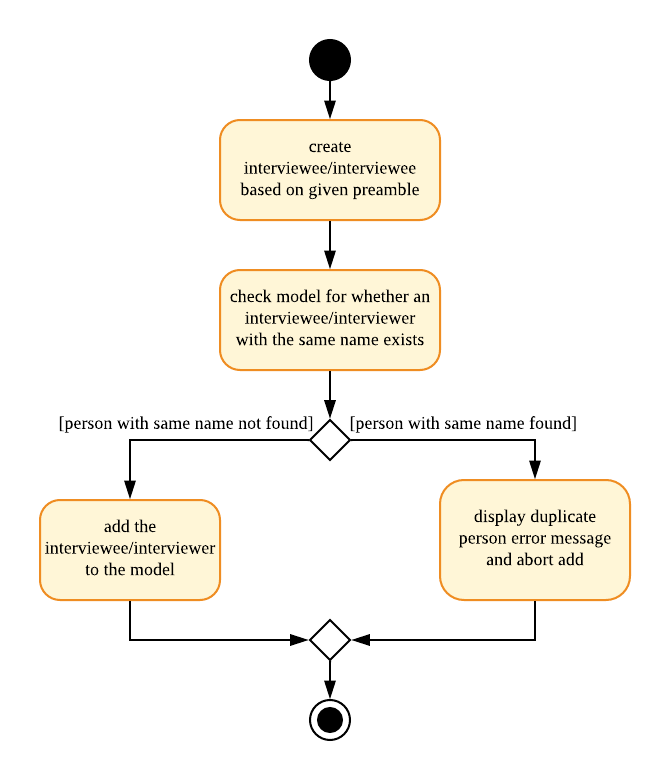
To better illustrate the flow of events from the moment a user inputs an add command till completion of the command, the continuation of the rake from the general activity diagram is shown below:
3.1.2. Edit Interviewee/Interviewer feature
The edit command allows a user to edit an Interviewee or Interviewer in the underlying IntervieweeList or InterviewerList of
ModelManager.
-
Upon successful parsing of the
editcommand arguments, the parser checks ther/ROLEprefix supplied -
If "interviewee" is supplied, an
EditIntervieweeDescriptorwhich stores the details to update theIntervieweewith is created with arguments from the user input, stored inArgumentMultimap.-
ArgumentMultimapis filled by a call to ArgumentMultimap.tokenize().
-
-
If "interviewer" is supplied, an
EditInterviewerDescriptoris created and populated instead. -
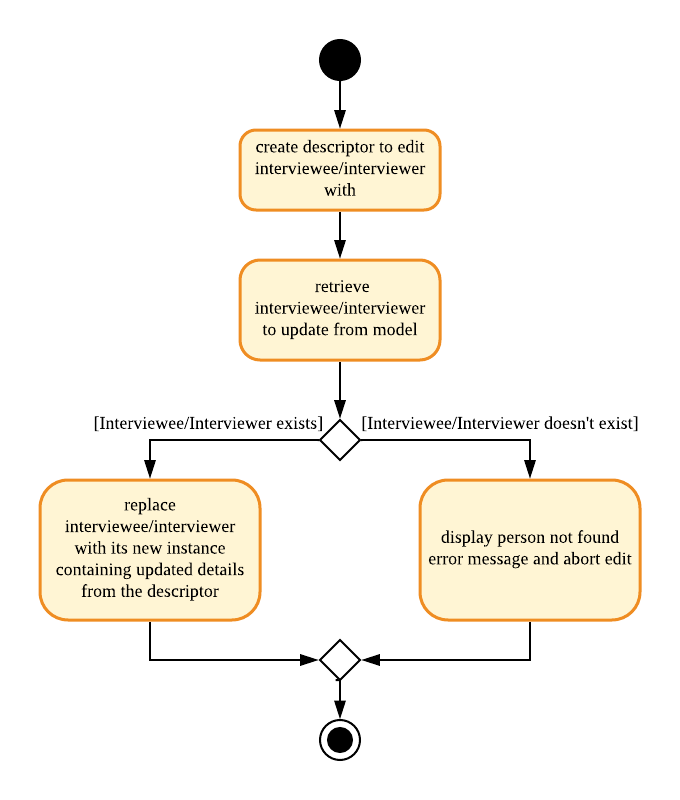
A new instance of
IntervieweeorIntervieweris then created from the descriptor. The entity to be updated is then retrieved from the list by name, and is replaced with the new instance.-
ModelManager#setInterviewee() or ModelManager#setInterviewer() is called.
-
The following Sequence Diagram below shows how the edit interviewee command works. The edit interviewer command works in a similar manner.
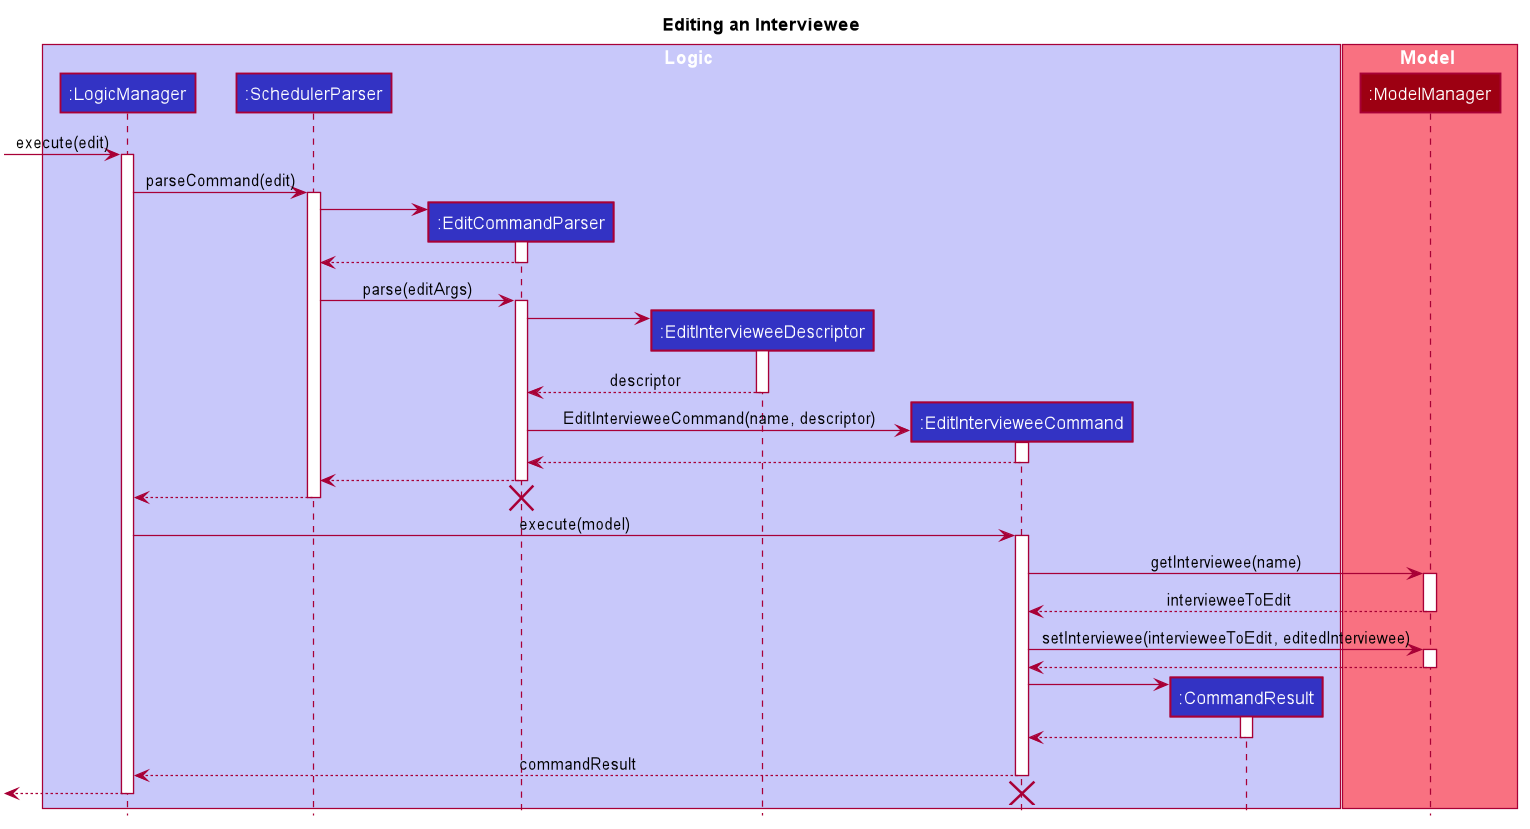
The lifeline for EditCommandParser and EditIntervieweeCommand should end at the destroy marker (X) but due to a limitation of PlantUML, the lifeline reaches the end of diagram.
|
-
See the general logic sequence diagram in Section 2.3: Logic component for a more complete view of how
Storageis affected as well.
To better illustrate the flow of events from the moment a user inputs an edit command till completion of the command, the continuation of the rake from the general activity diagram is shown below:
3.1.3. Delete Interviewee/Interviewer feature
The delete command allows a user to delete an Interviewee or Interviewer from the underlying IntervieweeList or InterviewerList
of ModelManager.
-
Upon successful parsing of the
deletecommand’s arguments, the name of the person to delete is retrieved. -
Based on the
r/ROLEprefix supplied, theIntervieweeListorInterviewerListis searched, and theInterviewee/Interviewerwith a matching name is deleted.-
ModelManager#deleteInterviewee() or ModelManager#deleteInterviewer() is called.
-
Note that the underlying
UniquePersonListensures that there are no two interviewees or interviewers with the same name in the list.
-
The following Sequence Diagram below shows how the delete interviewee command works. The delete interviewer command works in a similar manner.
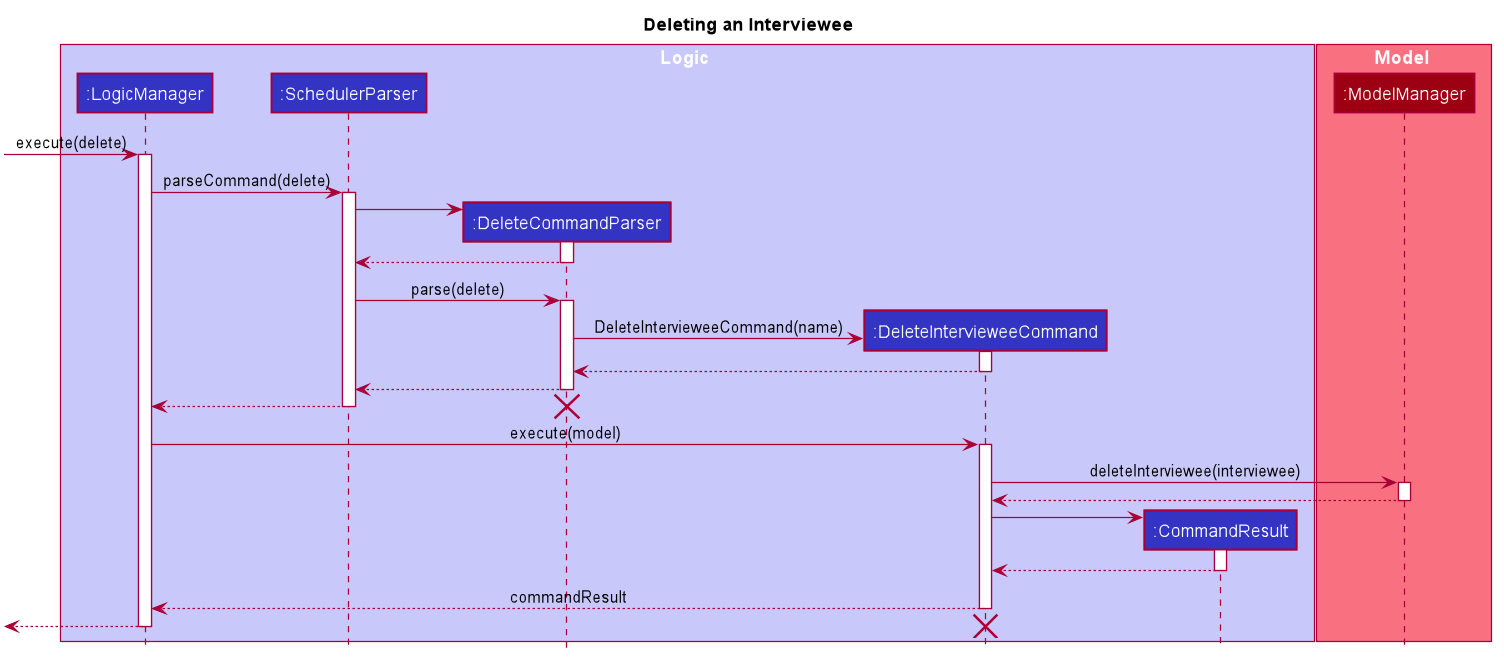
The lifeline for DeleteCommandParser and DeleteIntervieweeCommand should end at the destroy marker (X) but due to a limitation of PlantUML, the lifeline reaches the end of diagram.
|
-
See the general logic sequence diagram in Section 2.3: Logic component for a more complete view of how
Storageis affected as well.
To better illustrate the flow of events from the moment a user inputs a delete command till completion of the command, the continuation of the rake from the general activity diagram is shown below:

3.2. Scheduling Feature
3.2.1. Algorithm
The scheduling of interviews is essentially a maximum bipartite matching problem. The scheduling feature is trying to find the maximum number of matching between available interview slots and interviewees.
In this application, the selected algorithm is Hopcroft-Kap algorithm. The complexity of the algorithm is o(√v x e), which is reasonably fast. The relevant details of the algorithm are as below:
Vertex
Interviewee and interview slot.
Edge
An edge represents a possible matching relationship between interviewee and interview slot. An edge exists between interviewee and interview slot if and only if the interviewee can attend the slot.
Matching Criteria
An interviewee can match an interview slot (i.e. can attend it) if all the criteria below are fulfilled:
-
The timing of the slot matches one of the available timings of the interviewee.
-
The department of the interviewer at that interview slot matches the department of choice of the interviewee.
Explanation of the Algorithm
The activity diagram below summarises the key steps in the algorithm.
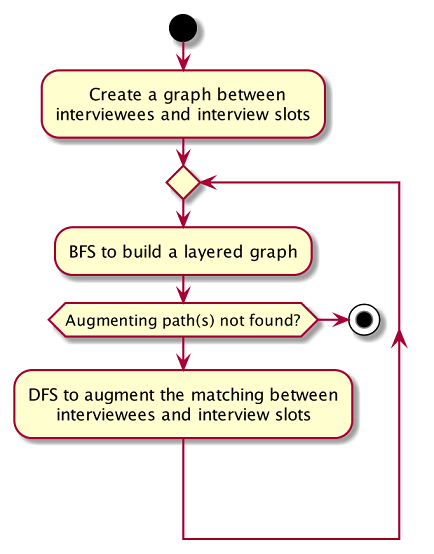
Referring to the diagram above, a graph between interviewees and interview slots will first be built. Specifically, the graph built is a bipartite graph where each interviewee is linked to the slot that it can match and vice versa, but interviewees are not linked with each other, same goes to interview slots. Thus, the 2 distinct groups of vertices in the graph are interviewee vertices and interview slot vertices. Before continuing, please read the below clarification about the terms unmatched and free.
| The term unmatched refers to a vertex that is not matched to its previous adjacent vertex by DFS. The term free refers to a vertex that is not matched to any other vertex yet by DFS. |
A breadth-first-search (BFS) is then conducted on all free vertices in the graph to search for augmenting paths which in the process will construct a layered graph. The BFS is slightly special as it will visit adjacent vertex in an alternating sequence of unmatched and matched edges.
The routine above is repeated until a layer of free vertices are found (i.e. augmenting path(s) is found) or the layered graph cannot be further extended (i.e. all augmenting path have been exhausted).
If augmenting path(s) exists, depth-first-search (DFS) will then be applied to every free vertex in the last layer of the layered graph to increase the number of matching between interviewee and interview slot. The DFS will start on one of the free vertices in the last layer and traverse through one of the augmenting path(s) which the free vertex lies in. When DFS hits the ends of an augmenting path, the unmatched and matched relationships between the vertices along the path will be flipped. Due to this alternating unmatched and matched relationship, the number of matching(a.k.a. cardinality) along the path will be increased by exactly 1 when the relationships along the path are flipped.
When the relationships are flipped, the vertices will be marked as used such that it cannot be used as one of the vertex along the other augmenting paths in the layered graph for the other iterations of DFS on the current layered graph.
The process of BFS followed by DFS will keep repeating until no more augmenting path(s) can be found in the bipartite graph of interviewee and interview slots, which marks the termination of the algorithm. At this point, the maximum number of matching have been found. This is based on a simple graph theory:
The number of matching in a graph is maximal if and only if no more augmenting path exist.
The theory above is so because if an augmenting path exists, it means that the number of matching along that path can be increased by 1, which in turn increases the number of matching in the graph.
Notes
-
Augmenting path: A simple path alternating between unmatched edges and matched edges. An augmenting path must start with a free vertex and ends with a free vertex. Thus, the patten of the alternating edges will always be unmatched, matched, unmatched …., matched, unmatched.
-
Matched edge: An edge is matched if the two vertices connected by it are matched to each other in previous iterations of the DFS. In the case of the application, one of the two vertices will be an interviewee and the other will be an interview slot.
-
Unmatched edge: An edge is unmatched if the two vertices connected by it are not matched to each other in previous iterations of DFS.
-
Layered graph: A layered graph is a graph formed by multiple layers of vertices. In this case, the layers are alternating between unmatched and matched vertices, except that the first layer of the graph are always a layer of free vertices. The last layer of the of the graph can either be a layer of matched vertices or free vertices (if augmenting path(s) exists). Below is an example of a layered graph:
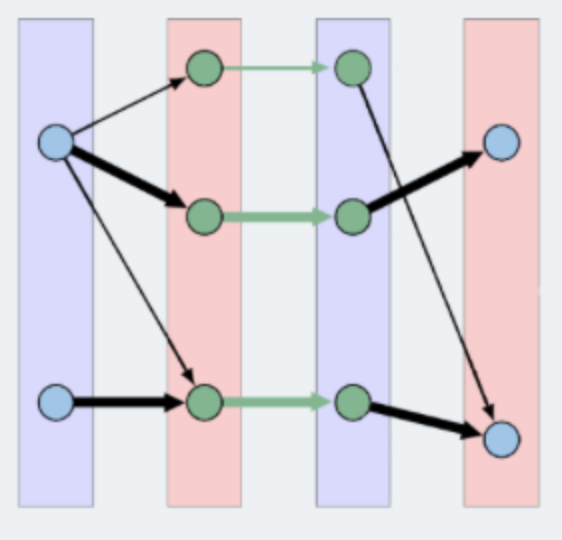
3.2.2. Implementation
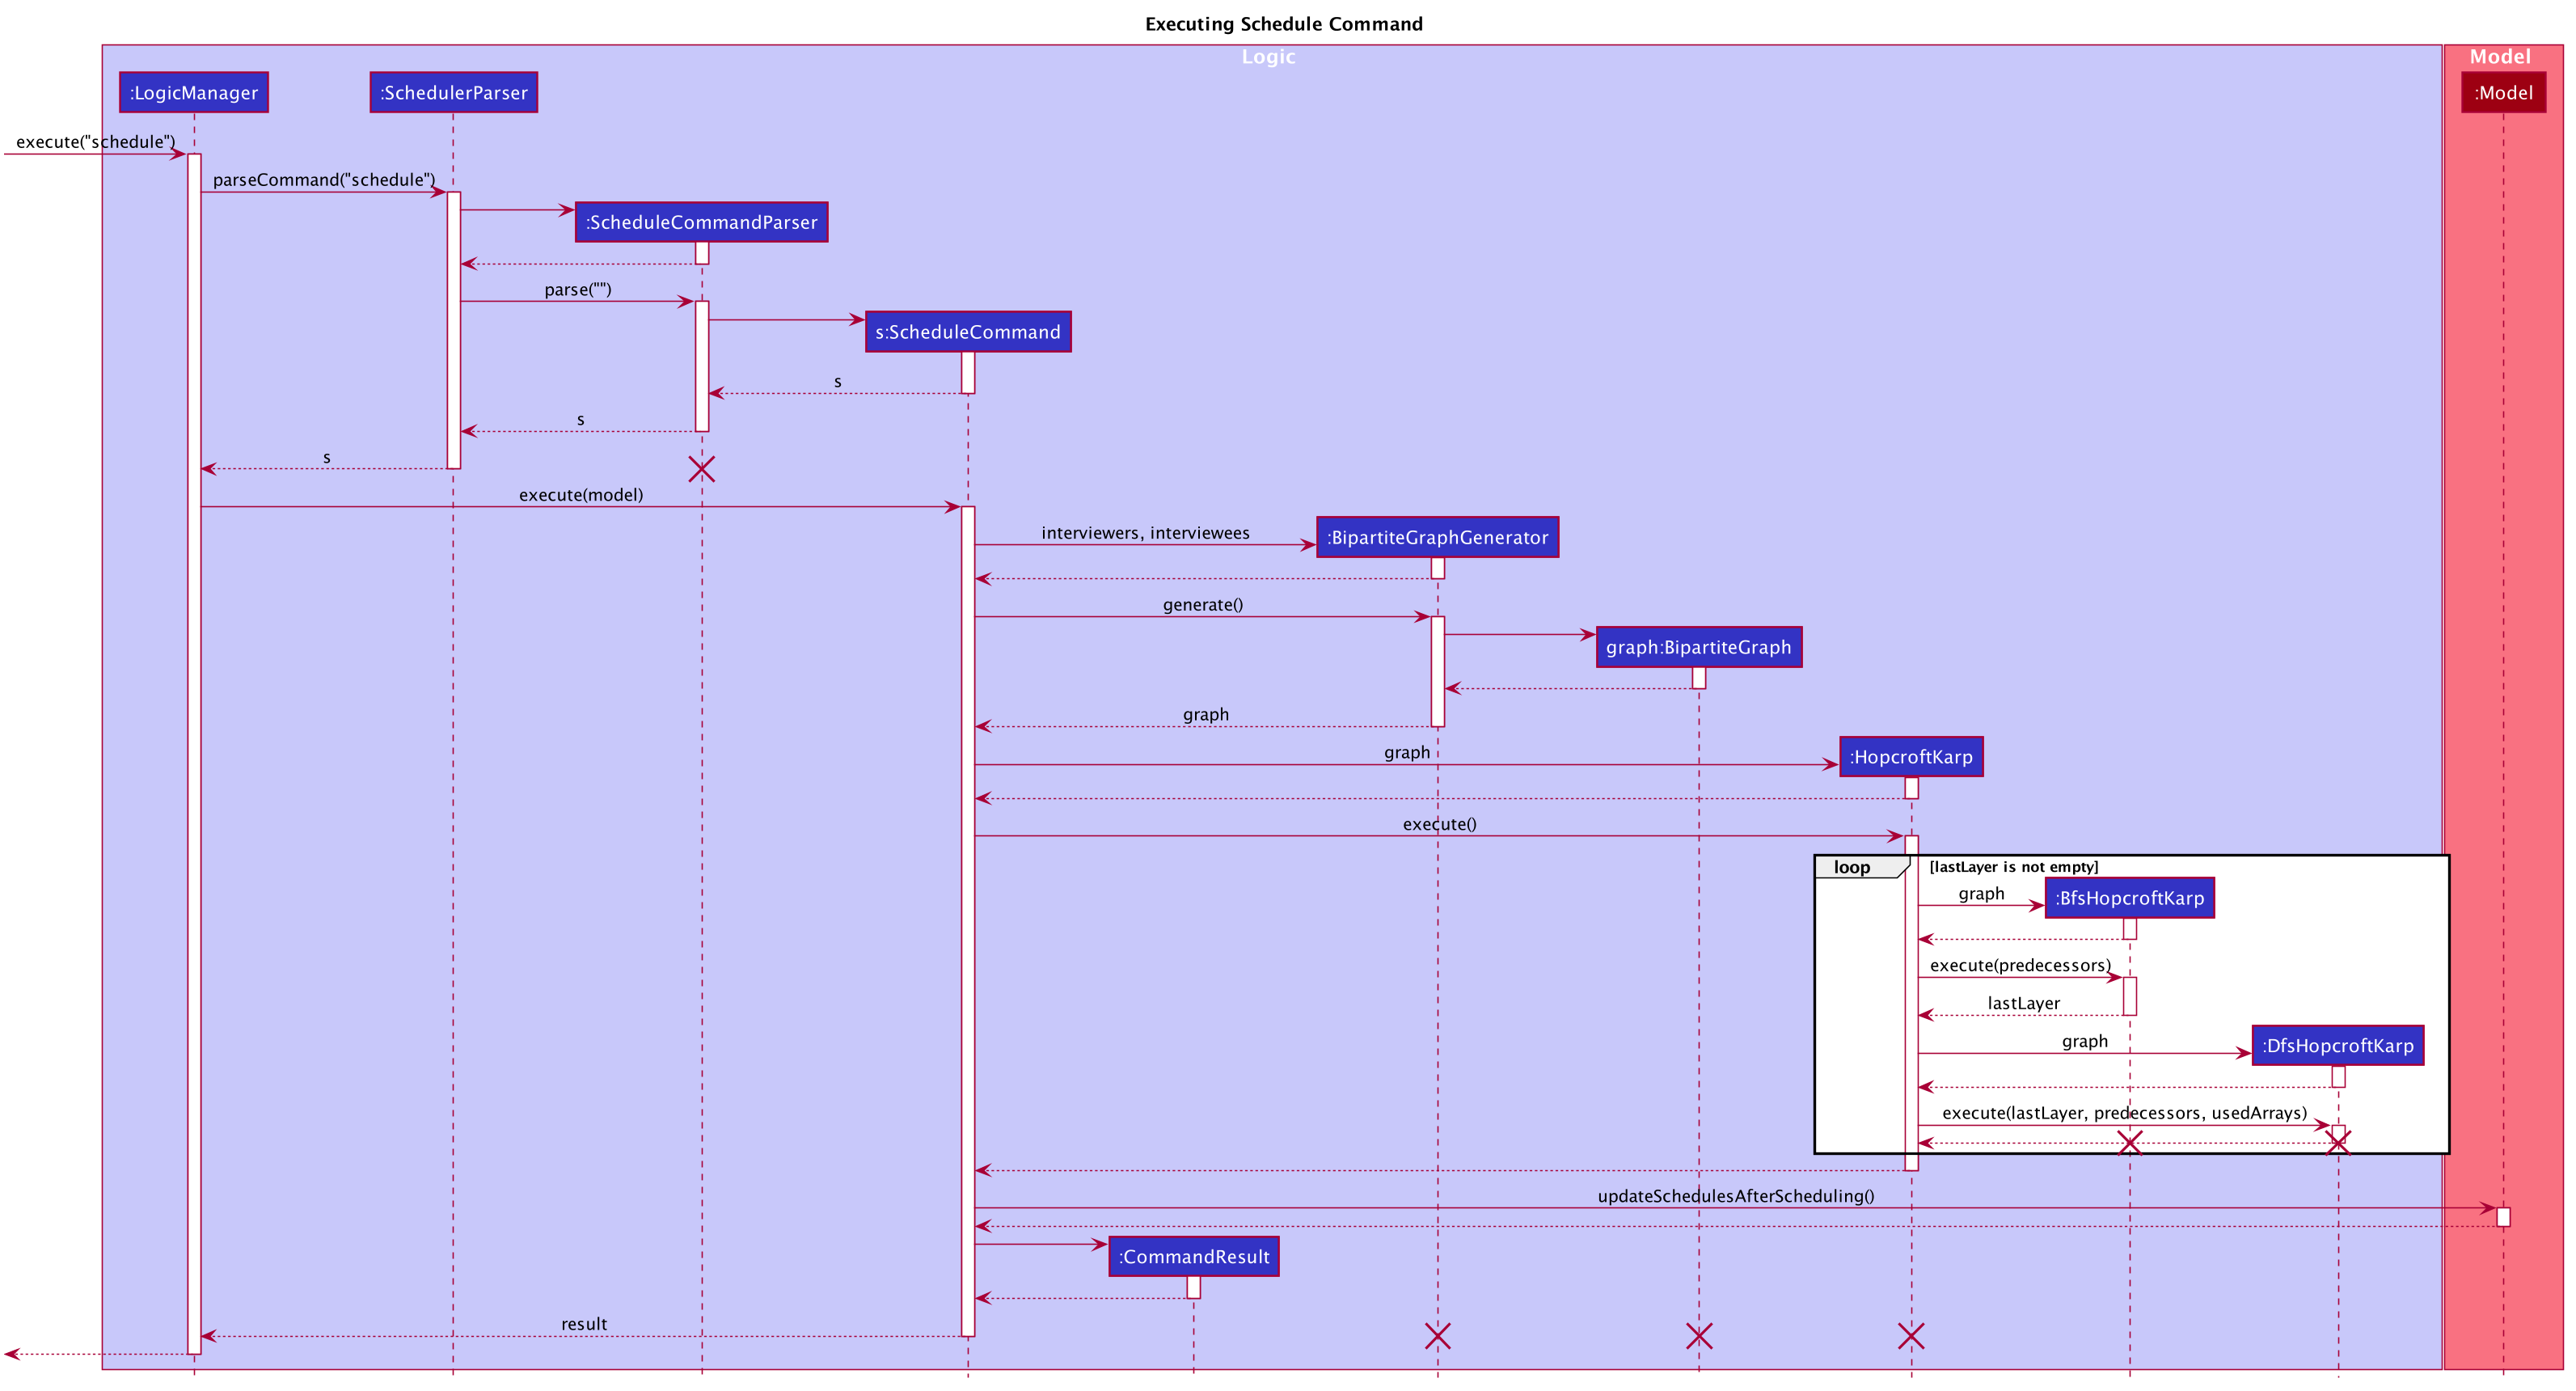
The implementation of the algorithm is encapsulated in the the graph subpackage in the logic package. Below is a
class diagram describing the essential components of the graph package.
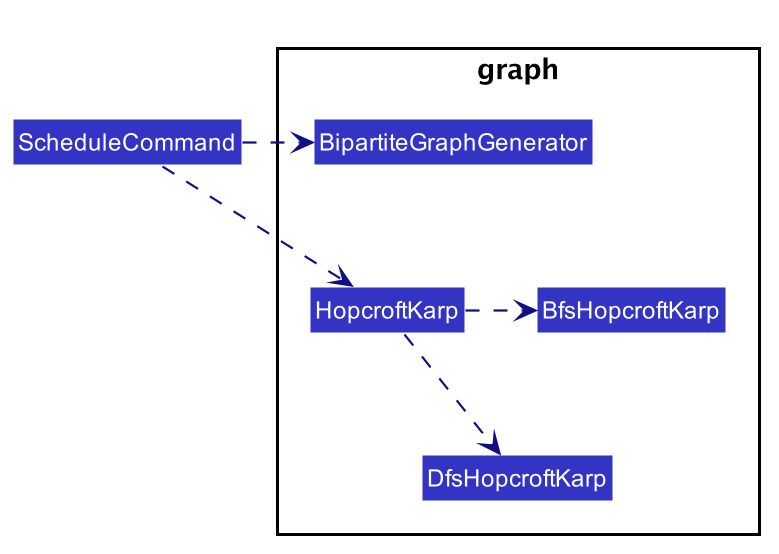
A Command object called ScheduleCommand makes use of the graph package to schedule the interviews for the interviewee.
It first uses BipartiteGraphGenerator to generates a BipartiteGraph which models the graph of interviewee and
interview slots. The BipartiteGraph object is then passed to a HopcrofKarp object which implements the logic of
HopcroftKarp algorithm, where the BFS and DFS logic is split into BfsHopcroftKarp and DfsHopcroftKarp object to better
manage the implementation of the algorithm.
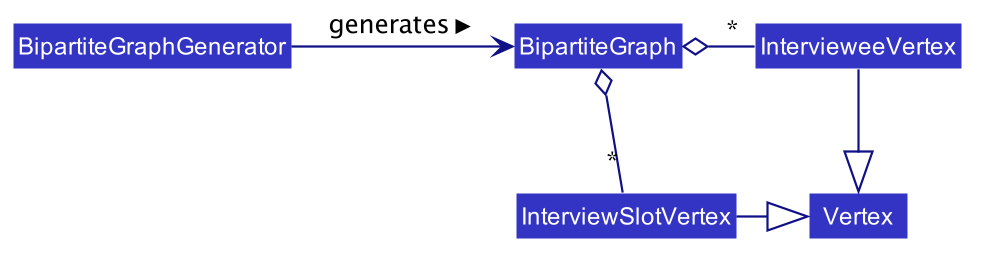
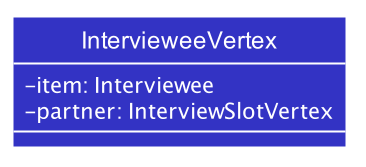
HopcroftKarp will then be executed which will run the algorithm and schedule interviews for the interviewees. To record
the result of scheduling, it will modify the matching status between IntervieweeVertex and InterviewSlotVertex in the
BipartiteGraph object passed to it.
After the HopcroftKarp algorithm has finished executing, ScheduleCommand will then use the BipartiteGraph object
to update the allocated slot to an Interviewee. It will also update the allocated slots to the Interviewer which will be
interviewing the Interviewee. Finally, the ScheduleCommand will interact with Model to reflect the scheduling result in
the Ui.
Below are some class diagrams and a sequence diagram to aid the above explanation.

3.3. Import
3.3.1. Implementation
The import feature uses CsvReader in the Model to read the given .csv file and stores the data into the model.
-
import interviewer fp/FILE_PATHstores the read data as a list ofInterviewerobjects in the model. -
import interviewee fp/FILE_PATHstores the read data as a list ofIntervieweeobjects in the model.
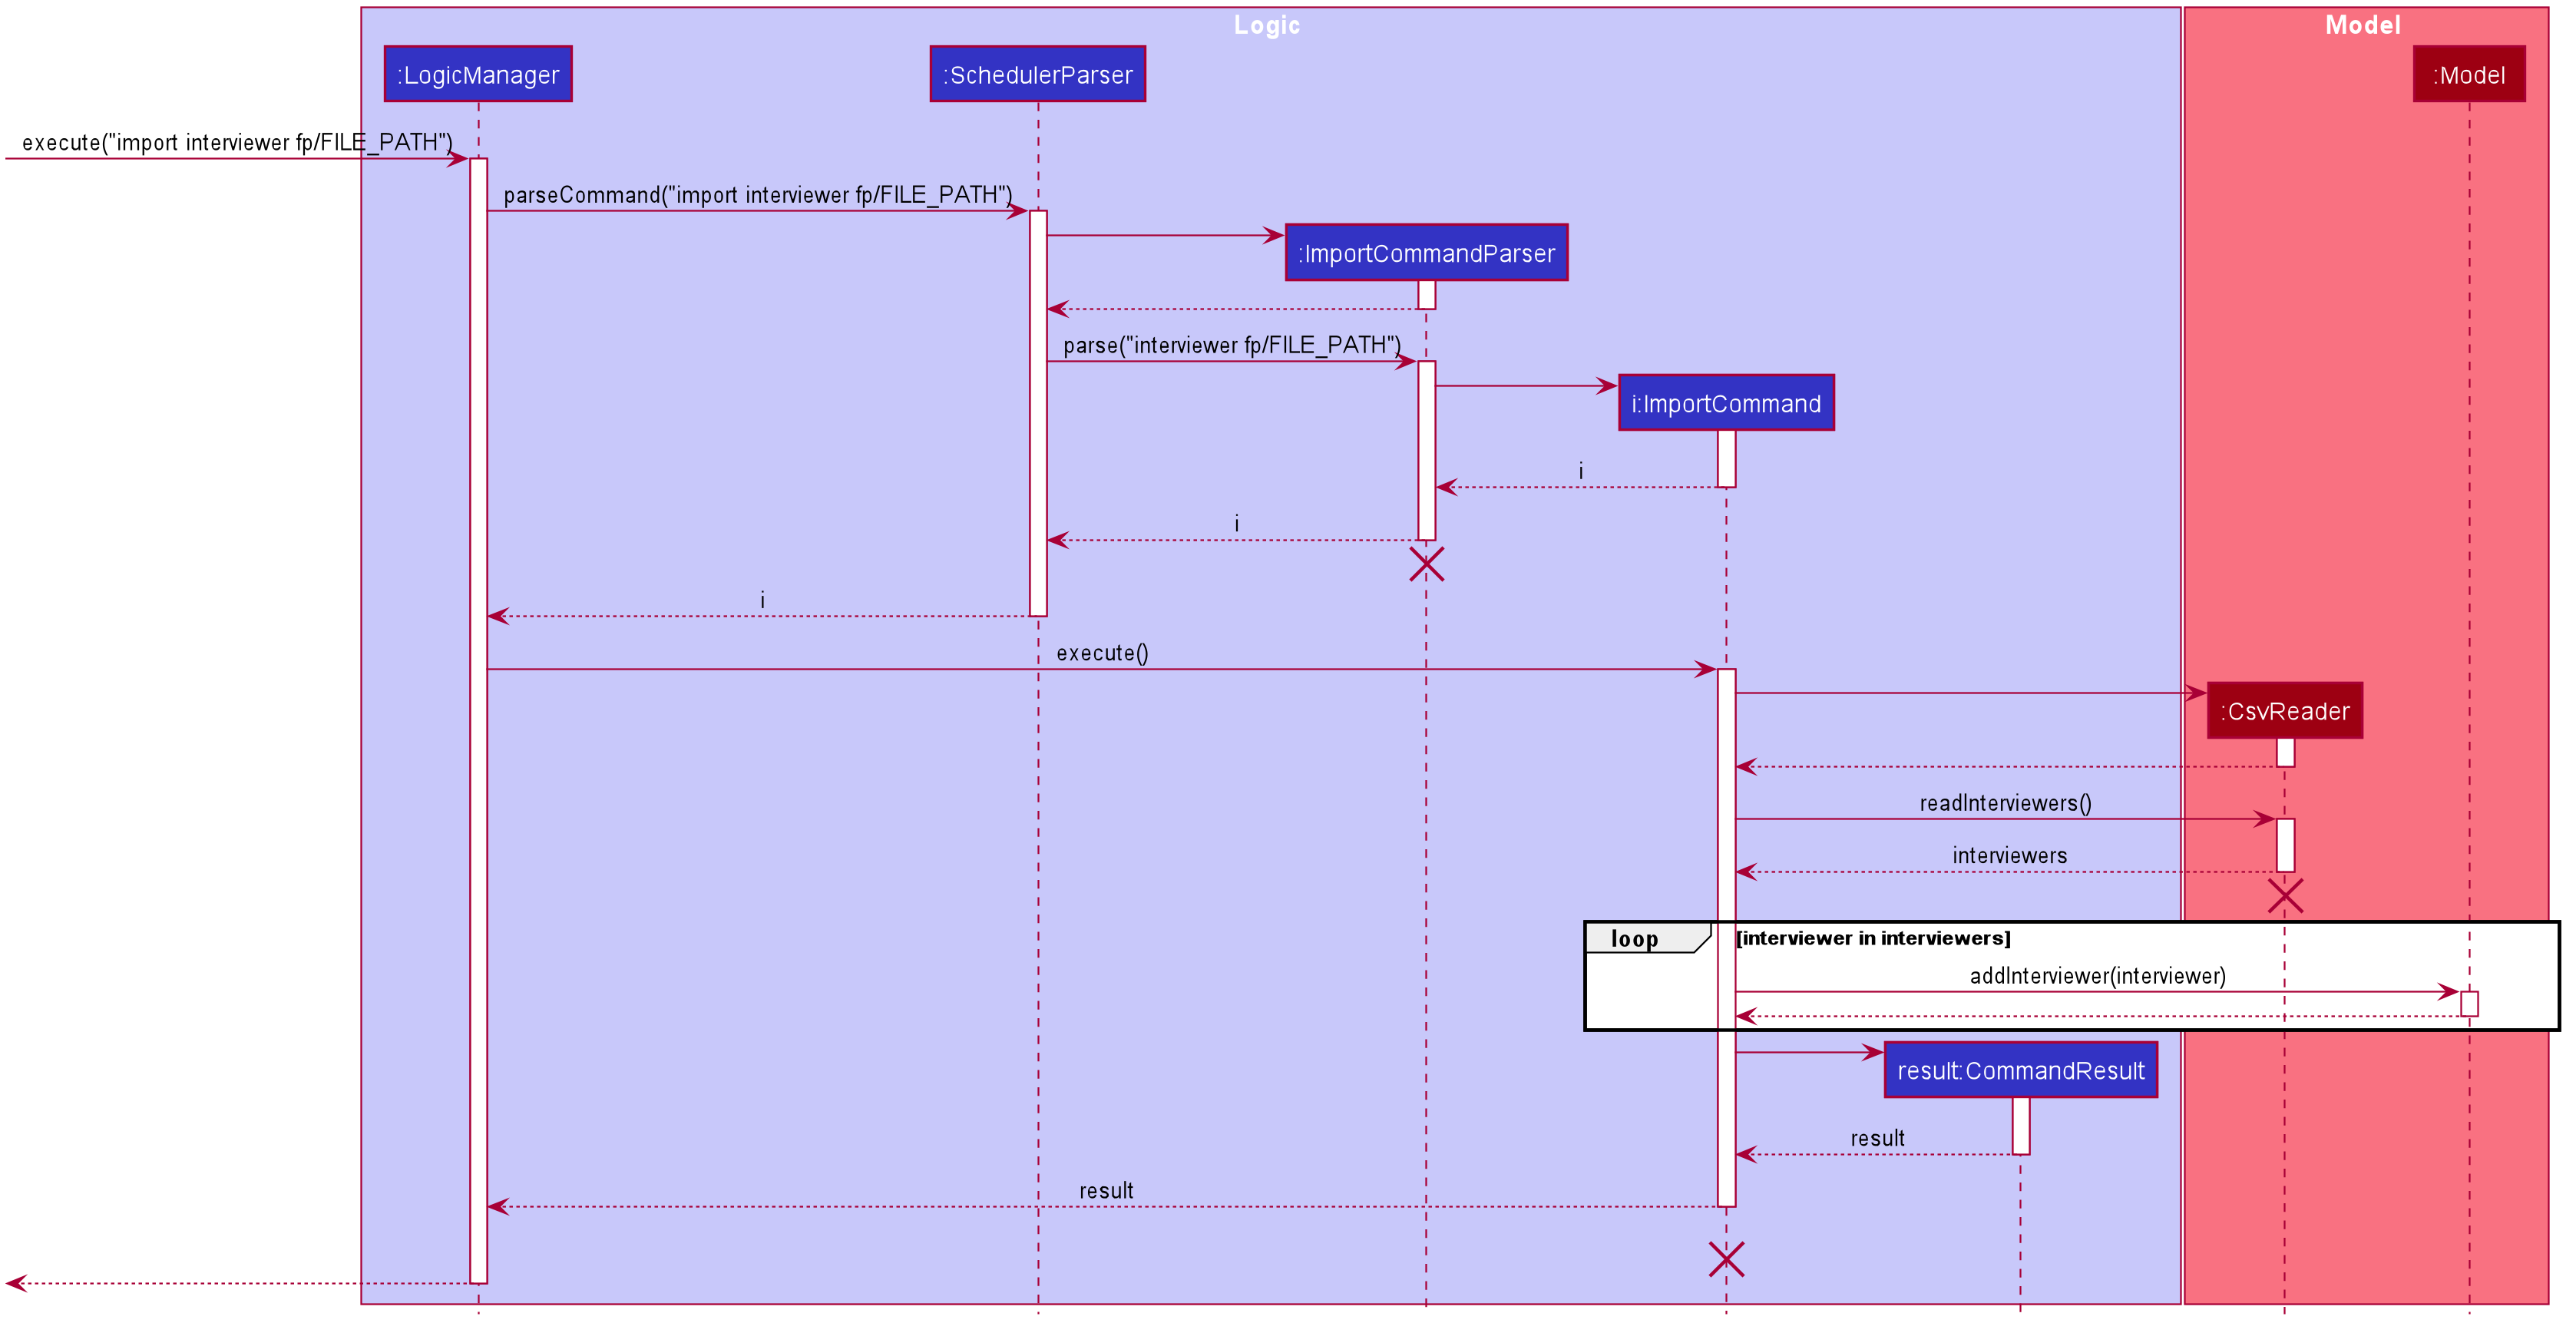
Given above is an example of a sequence diagram for importing interviewer’s schedules. It applies to both importing interviewee’s and interviewer’s data,
with the only difference being in the string processing methods in the CsvReader class.
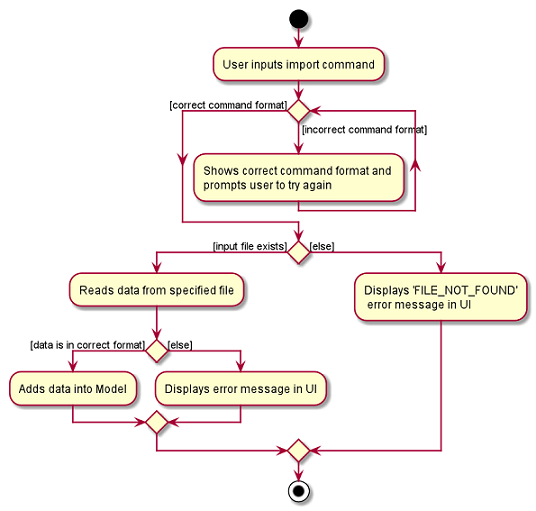
The following activity diagram summarizes what happens when a user executes a new command:
CsvReader
CsvReader class encapsulates the string processing process that happens in an import command. It makes use of BufferedReader to
access and read from the specified CSV file. It has 2 key methods - readInterviewers() and readInterviewees().
The following are some of the notable areas of implementation of these 2 methods:
readInterviewers():
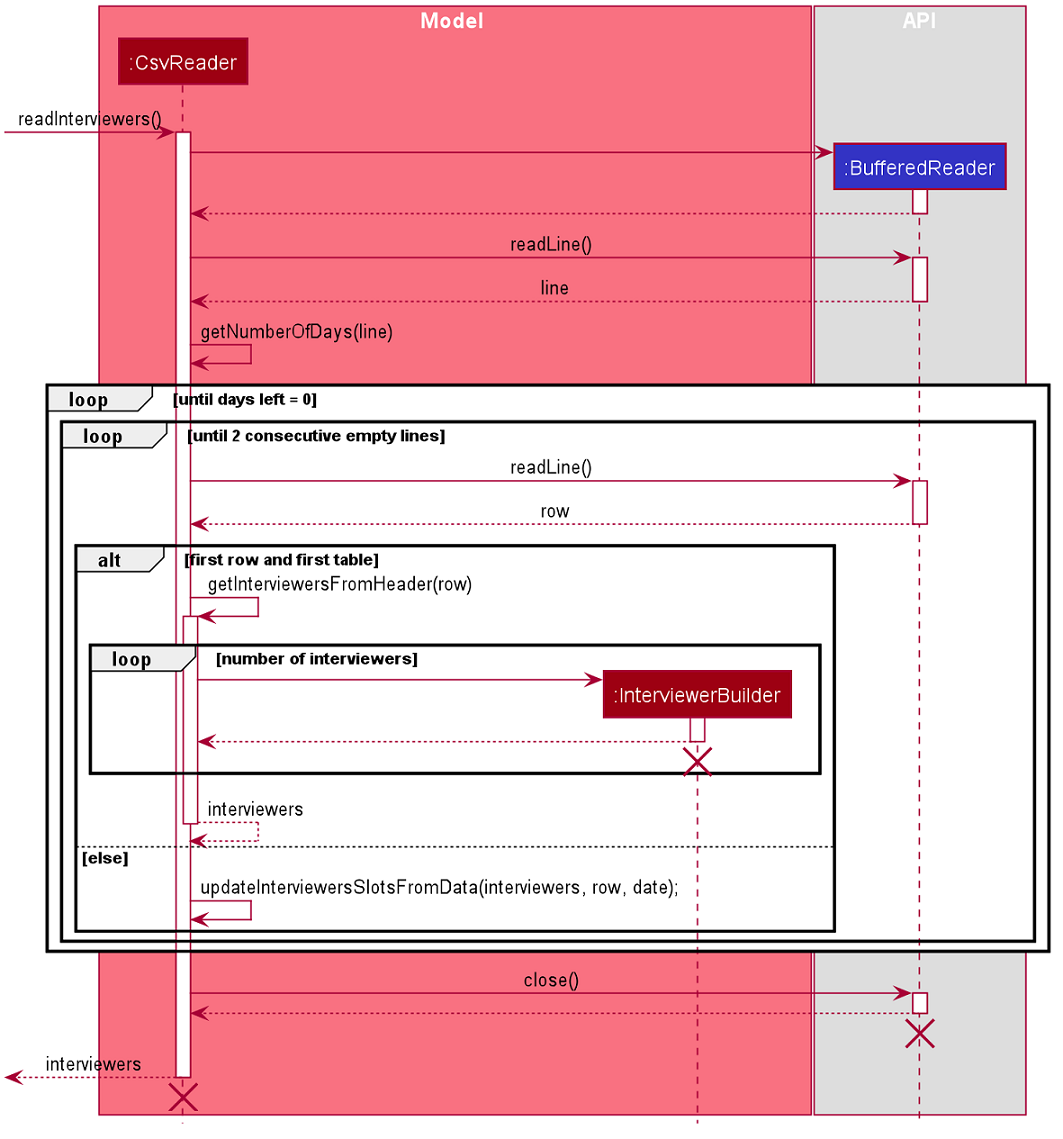
-
This method reads the imported file line-by-line. Number of days (each day is represented by 1 table) and the number of interviewers has to be specified at the beginning of the CSV file.
-
It generates a list of interviewers (with no availabilities yet) from the headers of each table.
-
Then, it will iterate through every line of each table and adds the availabilities to the respective interviewers.
-
The complexity of this method is O(N x D), where N is the number of interviewers and D is the number of days, assuming there are a constant number of timeslots per day.
readInterviewees():
-
This method is quite straightforward, reading each attribute from the given table into an interviewee object.
-
There can also be more than 1 preferred timeslot, which are separated by commas in the imported file.
-
The complexity of this method is O(N), where N is the number of interviewees.
The imported data must obey the pre-existing conditions for each property of both interviewees and interviewers.
E.g. name still cannot contain any characters other than alphabetical letters. No duplicate person is allowed as well.
Exceptions will be thrown and the relevant error messages will be displayed in the UI if such error occurs.
|
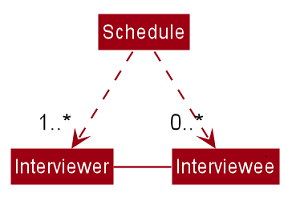
3.4. Updating Schedules in the Model
The list of schedules in the model should be updated every time a command modifies the IntervieweeList or InterviewerList in the model. This is because Schedules are dependent on both Interviewers and Interviews as shown in the class diagram below.
These are the commands that requires the update of the list
of schedules - add, delete, edit, import, clear and schedule.
3.4.1. Before Scheduling of Interviews
Before the 'schedule' command is ran, the list of schedules is solely dependent on the InterviewerList, since it is only through the scheduling of interviews that the data in the IntervieweeList is integrated with the data of the InterviewerList. Therefore, modification of IntervieweeList will not require changes in the list of schedules at this point of time.
To update the list of schedules in the model every time the InterviewerList is modified, the method
updateScheduleList() is called in the model. The notable implementations of this method are discussed below.
-
updateScheduleList()basically re-generates the list of schedules in the model from the updated InterviewerList. -
It will get
startTime,endTimeanddurationof a timeslot fromUserPrefand generates the allowed timeslots for daily schedules. -
Then, it will get a list of unique dates from the
availabilitiesfrom each of the interviewers in the updated InterviewerList. -
It will then loop through the each date, generating a table of the Interviewers' availabilities based on the allowed timeslots for each day. Each unique date should generate a Schedule object. The result is a list of Schedules.
-
Lastly, it will set the
scheduleListin the model with the newly generated list of schedules.
By re-generating the schedule list every time InterviewerList is modified, it does not matter whether an Interviewer is added or deleted, or if an attribute of an interviewer is modified, the schedule list will be responsive to these changes. The only trade-off is performance, due to the re-generation of the schedules every time a command is ran. However, this will not be a big issue if the number of interviewers is < 100.
3.4.2. After Scheduling of Interviews
After the scheduling algorithm is ran, each interviewer should have a list of allocated interviewee slots. With these slots and the current time table (with interviewers only) generated before the scheduling of interviews, we are able to update the current schedules by slotting in the allocated interviewee’s slots.
To prevent confusion and to ensure that the scheduled result is always updated with the latest database of interviewees and interviewers, add/delete/edit of interviewee or interviewer after scheduling will clear the scheduled result and reset the displayed schedules such that the schedules only display the availabilities of the interviewers. Thus, the user will need to run the schedule command again to re-schedule the interviews.
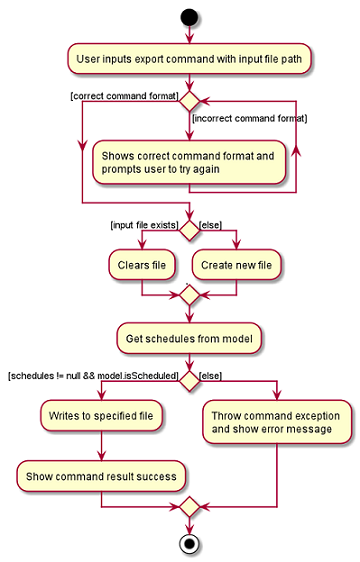
3.5. Export
3.5.1. Implementation
The Export command gets the scheduled time slots from the Model and writes them in the specified .csv file. CsvWriter facilitates the writing to the specified file.
-
CsvWriter makes use of
BufferedWriterto write data into the specified file.
Below shows the sequence diagram of an example export command.

The implementation is similar to the Import feature. The only differences are in the Model where CsvWriter gets
the scheduled time slots from the Model and proceeds to write it into the specified file using a BufferedWriter.
The Activity Diagram below summarises the execution of the export command.
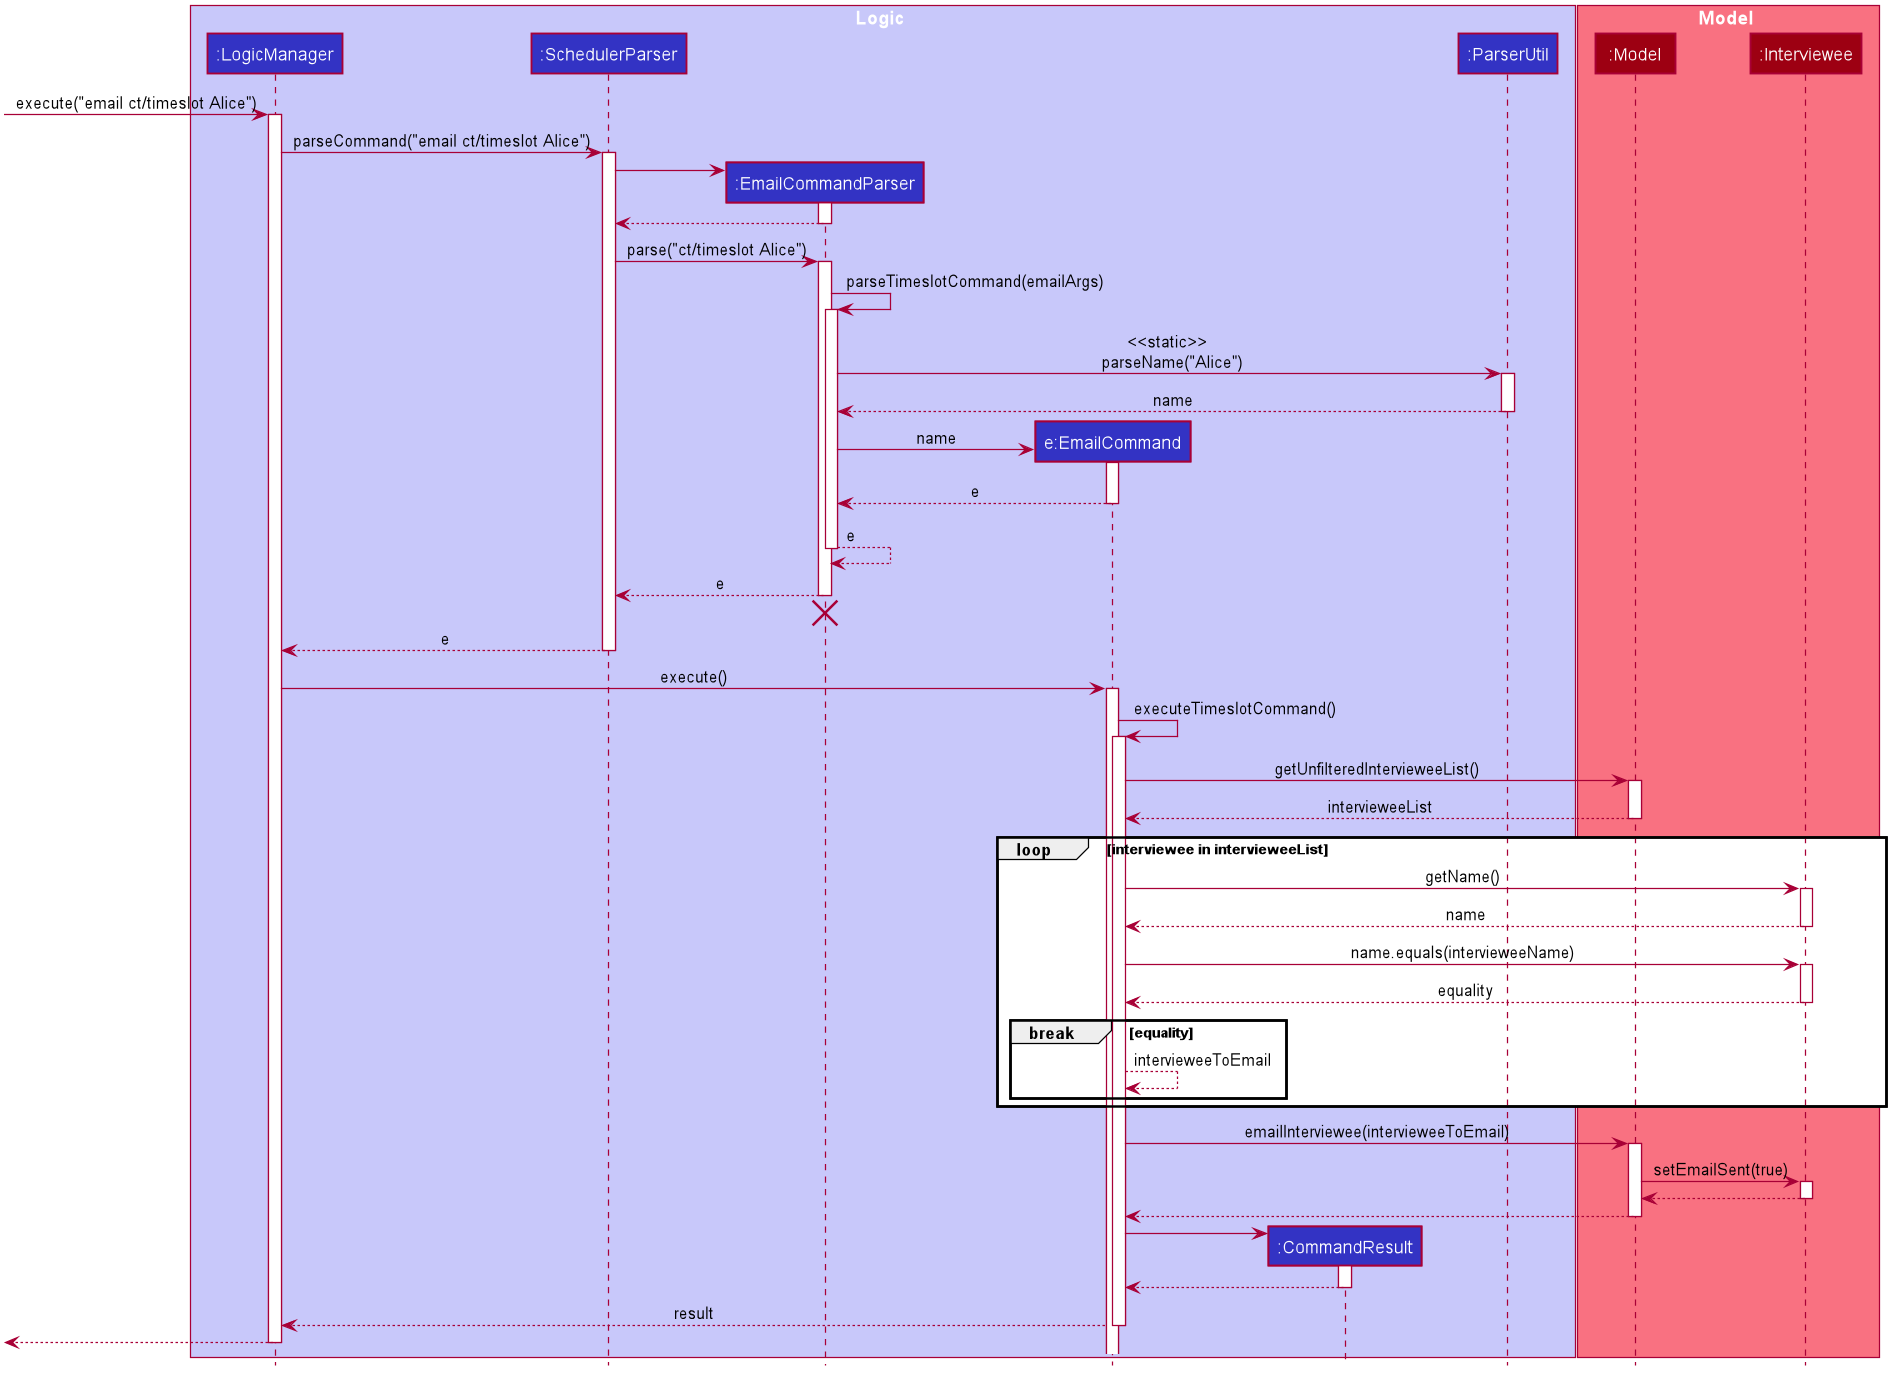
3.6. Email
3.6.1. Implementation
The Email feature makes use of the java.awt.Desktop package to activate the default Mail client of the user. For the case of computers without a Mail client available, this feature will not be supported (mainly for headless computers such as servers).
-
The
To:field is automatically populated with all the emails that are tagged to a particular Interviewee. This combines all the emails of both thePERSONALandNUSemail types. -
The
Cc:field is configurable by the user via an optional user preferences file (located inpreferences.json) -
The subject and message body are also automatically populated with details that are relevant to the Interviewee, depending on the context of the command used.
A similar implementation is used when emailing all interviewees (i.e. using the alltimeslot command type). However, interviewees with the emailSent boolean variable set to true will not be sent an email again. This can be overridden by emailing that particular interviewee again (using the timeslot command type).
The user is also able to check the email sending status (i.e. if a particular interviewee has been emailed before) using the status command type. It is simply going through the list of interviewees stored in the application and counting the number of interviewees with the emailSent boolean variable set to true.
| To the application, an email is considered as sent when the email window successfully opens on the user’s computer. It does not recognise the actual email being sent across the Internet. |
Example: Email interview timeslot to an interviewee
When the application opens an email dialog for sending the email to the selected Interviewee, the email dialog will be automatically populated with information on his/her allocated interview timeslot. The email message body also contains information that are customised to each Interviewee.
Details that vary according to the Interviewee include:
-
Name of the Interviewee
-
Date and time of allocated timeslot
Additional details that can be configured by the user (as user preferences) include:
-
Location to report
-
Any other additional information such as dress code.
The message content can also be configured by the user. However, a default template will be used when no such configuration file exists or is provided.
3.7. Display
3.7.1. Implementation
The display feature allows user to toggle views of schedules, interviewer list and interviewee list. It uses an interface named TabListener and contains the following method:
-
changeTabSchedule()allows user to change to schedule view. -
changeTabInterviewee()allows user to change to interviewee list view. -
changeTabInterviewer()allows user to change to interviewer list view.
The activity diagram will provide the overall flow of this implementation.
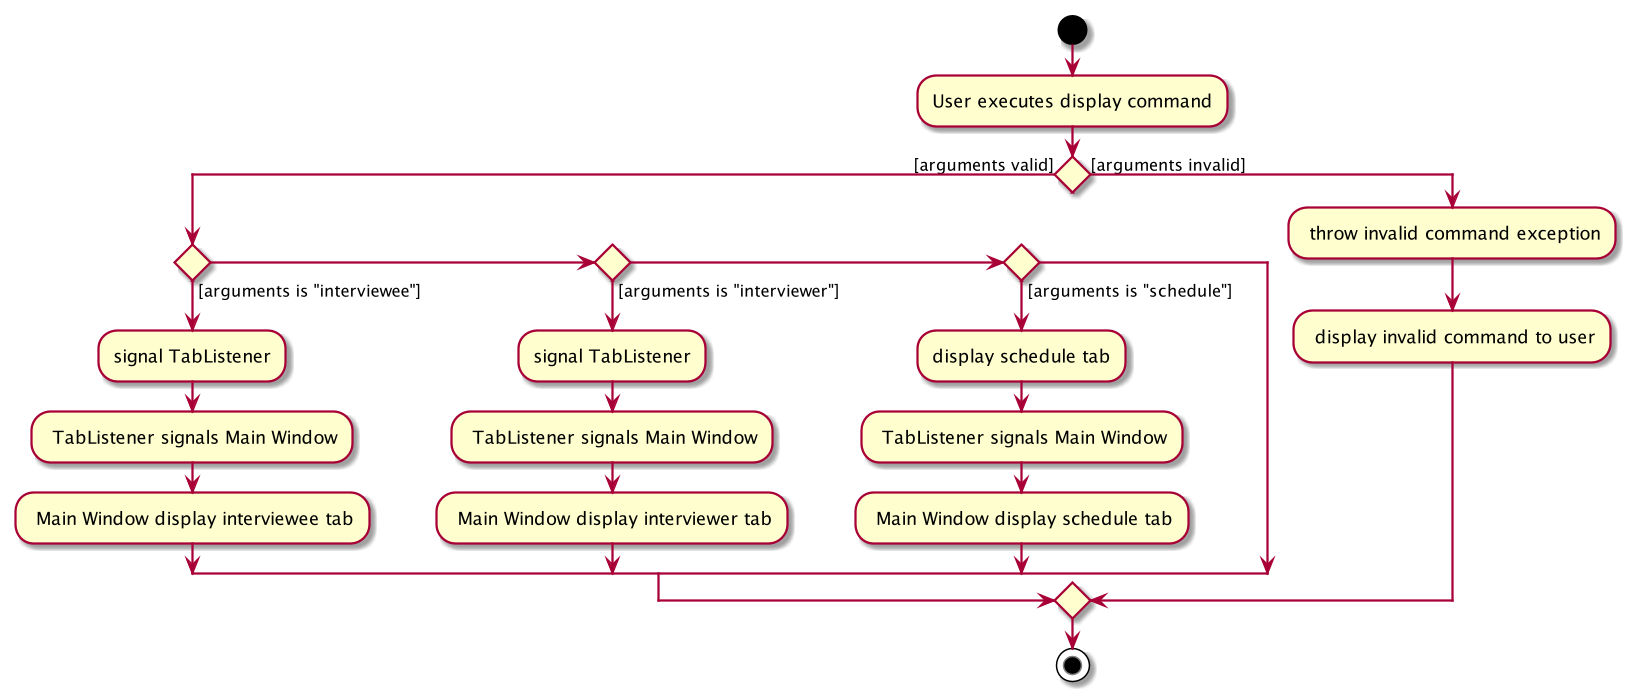
| For the activity diagram, plantUML is not able to have multiple alternate paths from a diamond. Thus, multiple diamonds are used to implement multiple alternate paths. |
3.8. Logging
We are using java.util.logging package for logging. The LogsCenter class is used to manage the logging levels and logging destinations.
-
The logging level can be controlled using the
logLevelsetting in the configuration file (See [Implementation-Configuration]) -
The
Loggerfor a class can be obtained usingLogsCenter.getLogger(Class)which will log messages according to the specified logging level -
Currently log messages are output through:
Consoleand to a.logfile.
Logging Levels
* SEVERE : Critical problem detected which may possibly cause the termination of the application
* WARNING : Can continue, but with caution
* INFO : Information showing the noteworthy actions by the App
* FINE : Details that is not usually noteworthy but may be useful in debugging e.g. print the actual list instead of just its size
Configuration
Certain properties of the application can be controlled (e.g user prefs file location, logging level) through the configuration file (default: config.json).
4. Documentation
Refer to the guide here.
5. Testing
Refer to the guide here.
6. Dev Ops
Refer to the guide here.
Appendix A: Product Scope
Target user profile:
-
has a need to manage and schedule many interviews with multiple interviewers involved.
-
prefer desktop apps over other types
-
can type fast
-
prefers typing over mouse input
-
is reasonably comfortable using CLI apps
Value proposition: manage the scheduling of interviews faster with CLI than mouse/GUI driven apps.
Appendix B: User Stories
Priorities: High (must have) - * * *, Medium (nice to have) - * *, Low (unlikely to have) - *
| Priority | As a … | I want to … | So that I can… |
|---|---|---|---|
|
new user |
see usage instructions |
refer to instructions when I forget how to use the App |
|
secretary of NUS CCA |
manually add new interviewees and their availabilities |
make changes without having to edit the .csv file and doing another import. |
|
secretary of NUS CCA |
delete an interview |
remove interviews that have been taken out. |
|
secretary of NUS CCA |
find a interviewee by name |
locate details of person and their interview without having to go through the entire list |
|
secretary of NUS CCA |
automate the process of scheduling interviews |
lighten my workload |
|
secretary of NUS CCA |
import the available timeslots of interviewees from a .csv template |
schedule the interviews for them |
|
secretary of NUS CCA |
export the scheduled interviews as a .csv file |
I can view and manage them in Excel |
|
secretary of NUS CCA |
add details of interviewee e.g. email/phone number |
easily view the details of the interviewees |
|
secretary of NUS CCA |
view a timetable of the finalized interview slots |
show the interviewers which timeslots they will be taking at a glance |
|
secretary of NUS CCA |
email blast the generated interview schedule to all interviewees |
inform the interviewees of their interview |
|
secretary of NUS CCA |
be informed if interview allocation of a certain interviewee has failed |
manually fix conflicts or get the interviewee to give another available timeslot |
|
very busy secretary of NUS CCA |
automate the process of scheduling interviews |
lighten my workload |
|
forgetful secretary of NUS CCA |
mark an interviewee as 'completed interview' |
track and manage uncompleted interviews |
|
secretary of NUS CCA |
add multiple tags to an interviewee in a single command |
I can be efficient |
|
fast-typer |
use CLI for the app instead of mouse/GUI |
access the commands in the fastest possible way |
|
developer |
CLI and GUI to be separated |
isolate either one for testing and debugging purposes |
|
secretary of NUS CCA |
track the attendance of my interviewees |
|
|
secretary of NUS CCA |
rank my interviewees by potential |
I would be able to evaluate them better |
|
secretary of NUS CCA |
be able to sort interviewees by ranking |
I can easily record down the shortlisted ones |
|
secretary of NUS CCA |
schedule group interviews |
I can use less manpower on days that I do not have enough interviewers |
|
busy secretary of NUS CCA |
share the current scheduled timeslots with another secretary |
give them access to help with the scheduling of interviews as well |
|
secretary of NUS CCA |
email the interview results to interviewees |
inform them of the outcomes of the interview |
|
secretary of NUS CCA |
hide private contact details by default |
minimize chance of someone else seeing them by accident |
|
secretary of NUS CCA with many interviewees |
sort persons by name |
locate an interviewee easily |
Appendix C: Use Cases
(For all use cases below, the System is the Scheduler and the Actor is the user, unless specified otherwise)
Use case: (UC-1) Delete interview slot
MSS
-
User requests to list interview slots
-
Scheduler shows a list interview slots
-
User requests to delete a specific interview slot in the list
-
Scheduler deletes the interview slot
Use case ends.
Extensions
-
2a. The list is empty.
Use case ends.
-
3a. The given index is invalid.
-
3a1. Scheduler shows an error message.
Use case resumes at step 2.
-
Use case: (UC-2) Import interviewee’s details
MSS
-
User requests to import interviewee’s details and specify file location.
-
Scheduler adds each imported interviewee into storage.
-
Scheduler imports interviewee’s details from specified file.
Use case ends.
Extensions
-
1a. Specified file doesn’t exist.
-
1b1. Scheduler displays file not found error message.
Use case resumes at step 1.
-
-
1b. Specified file doesn’t follow correct format.
-
1b1. Scheduler displays incorrect file format error message.
Use case resumes at step 1.
-
-
2a. There is duplicated data being added into storage.
-
2a1. Scheduler immediately terminates command.
-
2a2. Scheduler displays duplicated data error message.
Use case resumes at step 1.
-
Use case: (UC-3) Import interviewer’s details
MSS
-
User requests to import interviewer’s details and specify file location.
-
Scheduler adds each imported interviewer into storage.
-
Scheduler displays success message, as well as the imported data in the GUI.
Use case ends.
Extensions
-
1a. Specified file doesn’t exist
-
1b1. Scheduler displays file not found error message.
Use case resumes at step 1.
-
-
1b. Specified file doesn’t follow correct format
-
1b1. Scheduler displays incorrect file format error message.
Use case resumes at step 1.
-
-
2a. There is duplicated data being added into storage.
-
2a1. Scheduler immediately terminates command.
-
2a2. Scheduler displays duplicated data error message.
Use case resumes at step 1.
-
Use case: (UC-4) Schedule interview slots
MSS
-
User imports interviewee’s availability (UC-2)
-
User imports interviewer’s availability (UC-3)
-
User requests to generate timetable of all available interview time slots based on the availability of interviewers.
-
Scheduler generates timetable
-
User requests schedule interviewees based on the available timetable
-
Scheduler allocates interviewees into the time slots in the generated timetable
Use case ends.
Extensions
-
5a. Unable to fit all interviewees into timetable.
-
5a1. Scheduler shows an error message with the names of interviewees that are not allocated a slot.
Use case ends.
-
C.1. Use case: (UC-5) Display list of interviewee
MSS
-
User request to change display to interviewee.
-
Scheduler change to display the list of interviewees.
Use case ends.
Extensions * 1a. User does a typo while entering the command. * 1a1. Scheduler display invalid command to the user.
+ Use case resumes at step 1.
-
1b. User left the command blank after typing
display. -
1b1. Scheduler display invalid command to user.
Use case resumes at step 1.
C.2. Use Case: (UC-6) Export Schedules
MSS
-
User schedules interview slots (UC-4).
-
User requests to export scheduled data to external file path.
-
Scheduler gets scheduled data from storage.
-
Scheduler exports data to the specified file path.
Use case ends.
Extensions
-
2a. File path is not of the correct extension (.csv).
-
2a1. Scheduler displays error message in UI.
Use case resumes at step 1.
-
-
2a. External file path does not exist.
-
2a1. Scheduler creates a new file with the indicated file path.
Use case resumes at step 3.
-
-
3a. There is no scheduled data in storage.
-
3a1. Scheduler displays error message in the UI.
Use case resumes at step 1.
-
Appendix D: Non Functional Requirements
-
The software should work on any mainstream OS as long as it has Java
11or above installed. -
Should be able to hold up to 1000 interviewers and interviewees without a noticeable sluggishness in performance for typical usage.
-
A user with above average typing speed for regular English text (i.e. not code, not system admin commands) should be able to accomplish most of the tasks faster using commands than using the mouse.
-
The software should be simple enough to use without much manual intervention by the user.
-
The software should respond to the user actions within 5 seconds.
-
The source code should be open-source.
Appendix E: Glossary
- Availabilities
-
A list of date and times that either an interviewer or interviewee is available for an interview.
- Email blast
-
A process of sending an email to multiple recipients in rapid succession.
- Headless machine
-
A machine that is able to run the software, but does not have a graphical user interface (GUI) screen (i.e. monitor) attached.
- Interview
-
A particular time and date in which an interviewee meets an interviewer.
- Interviewee
-
A person that is attending an interview and is required to meet at least one interviewer.
- Interviewer
-
A person that is conducting interviews and is required to meet multiple interviewees.
- Mail client
-
A software that is capable of sending emails over the Internet and is able to respond to the "mailto:" URI scheme.
- Mainstream OS
-
Windows, Linux, Unix, OS-X
- Private contact detail
-
A contact detail that is not meant to be shared with others
- Secretary of NUS CCA
-
A hypothetical person that refers to the user of the software and is tasked to assign interviewees to interviewers.
- Timeslot
-
A date and time in which either the interviewer or interviewee is available for an interview.
Appendix F: Instructions for Manual Testing
Given below are instructions to test the app manually.
| These instructions only provide a starting point for testers to work on; testers are expected to do more exploratory testing. |
F.1. Launch and Shutdown
-
Initial launch
-
Download the jar file and copy into an empty folder
-
Open up terminal in the folder where the jar file is located and execute
java -jar scheduler.jar
Expected: Shows the GUI with three tabs(Schedules, Interviewers, Interviewees). The window size may not be optimum, you can drag around the edge of the window to expand it accordingly.
-
-
Saving window preferences
-
Resize the window to an optimum size. Move the window to a different location. Close the window.
-
Re-launch the app by double-clicking the jar file.
Expected: The most recent window size and location is retained.
-
F.2. Importing data
-
Import .csv files of interviewers' availability or interviewees' details using the
importcommand. -
Expected Outcomes:
-
Importing interviewers' data: The Schedules tab of the UI should be populated with the availability tables, similar to the format of the data imported. If none of the imported interviewers are available for any timeslot, ie. no "1"s in imported data, the Schedules tab will be empty. The Interviewer tab should also be accurately populated with the imported interviewers.
-
Importing interviewees' data: The Interviewee tab should be accurately populated with the imported data.
-
-
You can download the sample test data below to test if the import feature is working properly.
-
Interviewer data with zero availabilities: Interviewer Data
-
Both types of imported data should not contain any duplicates entries.
-
You can use the sample test data below to test if the duplicates are being detected correctly.
-
Import command can only be of 2 types - 'interviewer' or 'interviewee'. Test this by using any other combinations e.g.
import inTeVieWer -
File path specified must be of .csv extension and must exist.
-
Test this by using any file path without .csv extension. You can also try inputting a file path with .csv extension that does not exist. Both cases should induce error messages.
-
-
Importing interviewers' data after you have scheduled interviews should replace the existing tables in the Schedule tab with the newly imported data. You can test this by importing a new set of interviewer’s data after scheduling the interviews.
F.3. Exporting Schedules
-
Export the schedules generated by using the
exportcommand. -
Expected Outcomes: The external file that you input into the command should contain the schedule time tables, with all information represented accurately.
-
The export command should only work after you have ran the
schedulecommand. -
File path specified must be of .csv extension, but does not need to exist. Valid file paths that do not exist will be created after the command.
-
To test this you can use type in the following after a schedule command has been ran:
export fp/doesNotExistFile.csva file named "doesNotExistFile.csv" should be created in the same directory containing Scheduler.jar file.
-
F.4. Adding an entity manually
Please refer to the Add interviewees/interviewer section in the user guide for more detailed information on the add command.
For simplicity, we refer to interviewees and interviewers as entities collectively.
-
Upon launching Scheduler, input the following command to add an interviewee:
-
add interviewee n/Ronald p/88888888 t/CAP5 t/dogLover f/School of Computing ep/JohnDoe@gmail.com ew/JohnDoe@u.nus.edu y/2 d/Marketing s/20/09/2019 18:00-18:30
-
-
To add an interviewer, input the following command:
-
add interviewer n/Delilah p/98765432 ew/delilah@u.nus.edu d/Marketing s/20/09/2019 18:00-18:30
-
-
Expected: The Interviewees and Interviewers tab now reflects the newly added interviewee and interviewer, with each column in the tab corresponding to the various fields input. (i.e the column in the interviewees tab with header
namenow reflectsRonaldas input by the user) -
You can change the different prefix fields (e.g
n/Ronald) to any valid value, as stated in the User Guide under theaddcommand section.
F.5. Editing an entity
Please refer to the Edit interviewees/interviewer section in the user guide for more detailed information on the edit command.
This section follows directly from the previous section, adding an entity manually.
-
With Scheduler launched, input the following command in the user input field:
-
edit Ronald r/interviewee p/91234567
-
-
Expected: The Interviewees tab now reflects the edited interviewee, where
Ronaldnow has a phone number91234567. -
Now enter the following command in the user input field:
-
edit Delilah r/interviewer ew/delilah1995@u.nus.edu
-
-
Expected: The Interviewers tab now reflects the edited interviewer, where
Delilahnow has an emaildelilah1995@u.nus.edu. -
You can change, include or exclude the different prefix fields as long as within the boundaries specified in the User Guide under the
editcommand section.
F.6. Deleting an entity
Please refer to the Delete interviewees/interviewer section in the user guide for more detailed information on the delete command.
This section follows directly from the previous section, Editing an entity.
-
With Scheduler launched, input the following command in the user input field:
-
delete Ronald r/interviewee
-
-
Expected: The Interviewees tab now reflects the deleted interviewee, where
Ronaldis now missing from the tab. -
Now enter the following command in the user input field:
-
delete Delilah r/interviewer
-
-
Expected: The Interviewers tab now similar reflects the deleted interviewer
Delilah. -
You can delete any entity as long as the entity’s name is shown in the Interviewee/Interviewer tab. See the User Guide under the
deletecommand section for specifics.
F.7. Displaying different views from the Scheduler
Please refer to the UI Display section in the user guide for more detailed information on the display command.
-
Type
display intervieweeto display a list of interviewee in the scheduler. -
Expected: A table will be shown with the list of interviewees arranged in the format shown below.
-
Table will be filled when a list of interviewee is imported into the Scheduler.
-
You can also display the list of interviewers and the scheduled table by the command
display intervieweranddisplay schedulerespectively. -
The format for the displays are shown below.
F.8. Scheduling Interviews
-
Import .csv files of interviewers' availability and interviewees' details using the
importcommand.-
Please refer to the QuickStart section in the user guide to download the templates of the interviewers' availability and interviewees details.
-
-
Type
schedulein the text console of the app and press enter. -
Expected: Schedules in the
Schedulestab reflects the scheduled result accordingly, i.e. the name of the interviewee shows up in the interview schedule if its availability and department matches one of the available interview slots (originally marked as 1 in the schedules when the interviewer’s availability is imported). The text console will also shows relevant message about the interview result, e.g. "All interviewees are allocated with a slot!", "Interviewees that are not allocated a slot" followed by the number and name of the interviewees that are not allocated a slot, or "No matching is found :(". -
You can use the sample test data below to test if the scheduling feature is working properly.
-
All interviewees are allocated a slot (Interviewees data).
-
Some interviewees are allocated a slot (Interviewees data).
-
All interviewees are not allocated a slot (Interviewees data).
-
You can also design your own test data to check if the scheduling feature is working properly by adding some available interview slots in the interviewer’s availability template. Then, add interviewees which have availabilities and department that match the available interview slots. Import the data and check if the interviewees name show up in the schedules.
-
Note that some interviewees may not be allocated a slot because of unavoidable collisions between interviewees which have the same availability and department.
-
You can also test the opposite way, i.e. design test data which contains interviewees that cannot be allocated a slot and check if the name of the interviewee does not exist in the schedule.
-
F.9. Emailing an Interviewee
-
Import .csv files of interviewers' availability and interviewees' details using the
importcommand.-
Please refer to the QuickStart section in the user guide to download the templates of the interviewers' availability and interviewees details.
-
-
Type
schedulein the text console of the app and press Enter.-
You can use the sample test data below to get a combination of interviewees and interviewers that can be matched.
-
-
After an interview schedule has been successfully generated, you can try to email one of the interviewees that have been allocated a slot using the
email ct/timeslotcommand. For the sample test data above, you can tryemail ct/timeslot n/John Doeto send an email to John Doe.-
Expected: Your mail client will open with the Compose window. The
To,Cc,Subjectand message body is pre-populated with the details specific to the interviewee that you have selected.
-
-
If you do not have a mail client installed, or you are running this software in a headless machine, it is expected that no Compose windows will appear, and an error message will be returned about having a missing mail client.
F.10. Emailing all Interviewees
-
Import .csv files of interviewers' availability and interviewees' details using the
importcommand.-
Please refer to the QuickStart section in the user guide to download the templates of the interviewers' availability and interviewees details.
-
-
Type
schedulein the text console of the app and press Enter.-
You can use the sample test data below to get a combination of interviewees and interviewers that can be matched.
-
-
After an interview schedule has been successfully generated, email one interviewee using the
email ct/timeslotcommand and choosing any interviewee that has a slot allocated. -
After you emailed one of the interviewees, you can try to email the remaining interviewees using the
email ct/alltimeslotcommand.-
Expected: Your mail client will open with multiple Compose windows for each of the interviewees that have been allocated a slot but have not been emailed yet. The interviewee that was emailed in step 3 will not appear again.
-
-
If you do not have a mail client installed, or you are running this software in a headless machine, it is expected that no Compose windows will appear, and an error message will be returned about having a missing mail client.
F.11. Getting the status of the email sending process
-
Import .csv files of interviewers' availability and interviewees' details using the
importcommand.-
Please refer to the QuickStart section in the user guide to download the templates of the interviewers' availability and interviewees details.
-
-
Type
schedulein the text console of the app and press Enter.-
You can use the sample test data below to get a combination of interviewees and interviewers that can be matched.
-
-
After an interview schedule has been successfully generated, you can obtain the status of the email sending process using the
email ct/statuscommand.-
Expected: A message will appear with the statistics on the number of interviewees that have been emailed before. There should be 0 interviewees in this case.
-
-
Send an email to an interviewee that has a slot allocated using the
email ct/timeslotcommand. -
After sending the email to the interviewee, you can obtain the status of the email sending process again using the
email ct/statuscommand.-
Expected: The same message will appear as in step 3, except that the message will reflect that there is 1 interviewee that has been sent an email.
-